Revitalize and Renew: A Guide to Painting Kitchen Countertops on a Budget

Welcome to Revitalize and Renew: A Guide to Painting Kitchen Countertops on a Budget! This guide will provide you with all the information you need to successfully paint your kitchen countertops without breaking the bank. We will cover the materials and tools you need, the steps to take, and the best techniques to use to get the job done right. We will also provide tips and tricks to help you save money and time while still achieving a professional-looking finish. So, if you’re looking to give your kitchen a facelift without spending a fortune, this guide is for you!

How to Revitalize Your Kitchen with a Fresh Coat of Paint: A Step-by-Step Guide to Painting Kitchen Countertops on a Budget

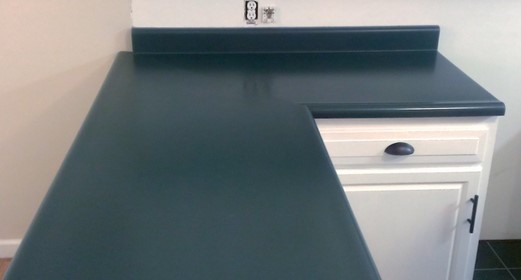
Revitalizing a kitchen with a fresh coat of paint is a great way to give the space a new look without breaking the bank. Painting kitchen countertops is a relatively simple and cost-effective way to update the look of the kitchen. This step-by-step guide will provide the necessary information to successfully paint kitchen countertops on a budget.

Step 1: Prepare the Countertop

Before beginning the painting process, it is important to properly prepare the countertop. Begin by cleaning the countertop with a mild detergent and warm water. Once the countertop is clean, use a sandpaper to lightly sand the surface. This will help the paint adhere better to the countertop.

Step 2: Apply Primer

Once the countertop is clean and sanded, it is time to apply a primer. Primer helps the paint adhere better to the surface and provides a better finish. Use a brush or roller to apply the primer in thin, even coats. Allow the primer to dry completely before moving on to the next step.

Step 3: Paint the Countertop

Once the primer is dry, it is time to paint the countertop. Use a brush or roller to apply the paint in thin, even coats. Allow the paint to dry completely between coats. Depending on the type of paint used, it may be necessary to apply multiple coats.

Step 4: Seal the Countertop

Once the paint is completely dry, it is important to seal the countertop. This will help protect the paint and make it last longer. Use a sealant specifically designed for kitchen countertops and apply it in thin, even coats. Allow the sealant to dry completely before using the countertop.

By following these steps, it is possible to successfully paint kitchen countertops on a budget. With a little bit of time and effort, it is possible to revitalize a kitchen with a fresh coat of paint.

Renew Your Kitchen with a New Look: Tips and Tricks for Painting Kitchen Countertops on a Budget

Painting kitchen countertops is a great way to give your kitchen a fresh, new look without breaking the bank. With a few simple tips and tricks, you can easily transform your kitchen countertops on a budget.

First, it is important to choose the right paint for the job. For countertops, you will want to use a high-quality, durable paint that is designed for use on countertops. This will ensure that your countertops will last for years to come. Additionally, you will want to choose a paint that is easy to clean and maintain.

Once you have chosen the right paint, you will need to prepare the countertops for painting. This includes cleaning the countertops thoroughly and sanding them down to create a smooth surface. You may also want to use a primer to ensure that the paint adheres properly.

Once the countertops are prepped, you can begin painting. Start by applying a thin coat of paint and then let it dry completely before applying a second coat. Make sure to use even strokes and to cover the entire surface.

Finally, you will want to seal the countertops to protect them from wear and tear. You can use a sealant or a polyurethane finish to do this. This will help to ensure that your countertops look great for years to come.

By following these simple tips and tricks, you can easily give your kitchen a new look on a budget. With a little bit of effort, you can transform your kitchen countertops and give your kitchen a fresh, new look.Revitalize and Renew: A Guide to Painting Kitchen Countertops on a Budget is an invaluable resource for anyone looking to update their kitchen countertops without breaking the bank. With detailed instructions and helpful tips, this guide provides a comprehensive overview of the painting process, from preparation to cleanup. Whether you’re a novice or an experienced DIYer, this guide will help you achieve the look you want without spending a fortune. With the right tools and materials, you can easily transform your kitchen countertops and give them a fresh, new look.

Countertop Comeback: Transforming Surfaces with a Countertop Resurfacing Kit

Source : https://www.amandaseghetti.com

Countertop Comeback is a revolutionary countertop resurfacing kit that can transform any surface into a beautiful, modern, and durable countertop. With this kit, you can easily and quickly transform your outdated countertops into a stunning new look. The kit includes everything you need to resurface your countertops, including a special adhesive, a variety of colors and textures, and a detailed instruction manual. With Countertop Comeback, you can easily and affordably give your kitchen or bathroom a fresh, modern look.

How to Transform Your Kitchen with a Countertop Resurfacing Kit

Countertop resurfacing kits are an easy and cost-effective way to transform the look of a kitchen. With a few simple steps, homeowners can give their kitchen a fresh, modern look without the expense and hassle of a full remodel.

The first step in using a countertop resurfacing kit is to prepare the surface. This includes cleaning the countertop thoroughly and removing any existing sealant or wax. Once the surface is clean and dry, it is important to sand the countertop to create a smooth, even surface. This will ensure that the new finish adheres properly and looks its best.

Next, the countertop should be wiped down with a damp cloth to remove any dust or debris. Once the surface is clean, the resurfacing kit can be applied. Depending on the type of kit, this may involve mixing a two-part epoxy or applying a single-part coating. The instructions included with the kit should be followed carefully to ensure the best results.

Once the resurfacing kit has been applied, it is important to allow it to cure properly. This may take several hours or even days, depending on the type of kit used. Once the finish has cured, it can be sealed with a clear sealant to protect it from stains and scratches.

With a few simple steps, homeowners can easily transform their kitchen with a countertop resurfacing kit. This cost-effective solution can give any kitchen a fresh, modern look without the expense and hassle of a full remodel.

The Benefits of Using a Countertop Resurfacing Kit to Refresh Your Home

Countertop resurfacing kits are an increasingly popular way to refresh the look of a home without the expense and hassle of a full remodel. These kits provide a cost-effective and efficient way to update the look of a kitchen or bathroom without the need for a full renovation.

The primary benefit of using a countertop resurfacing kit is the cost savings. These kits are significantly less expensive than replacing the countertops, and they can be completed in a fraction of the time. The kits come with all the necessary materials and instructions, making them easy to use even for those with limited DIY experience.

Another benefit of using a countertop resurfacing kit is the range of options available. These kits come in a variety of colors and finishes, allowing homeowners to customize the look of their countertops to match their existing décor. The kits also come with a variety of textures, allowing homeowners to choose a finish that best suits their needs.

The kits are also easy to maintain. The materials used in the kits are designed to be durable and long-lasting, and they can be easily cleaned with a damp cloth. This makes them ideal for busy households, as they require minimal upkeep.

Finally, countertop resurfacing kits are an environmentally friendly option. The materials used in the kits are non-toxic and biodegradable, making them a safe and sustainable choice.

In conclusion, countertop resurfacing kits are an ideal way to refresh the look of a home without the expense and hassle of a full remodel. These kits provide a cost-effective and efficient way to update the look of a kitchen or bathroom, and they come with a variety of colors, finishes, and textures to choose from. They are also easy to maintain and environmentally friendly.Countertop Comeback is an innovative and cost-effective way to transform the look of any countertop. With a Countertop Resurfacing Kit, homeowners can easily and quickly update their countertops with a fresh, modern look. The kit is easy to use and provides a durable finish that will last for years. With the Countertop Comeback kit, homeowners can enjoy a beautiful, updated countertop without the hassle and expense of a full remodel.

Tips on log cabin kitchen ideas

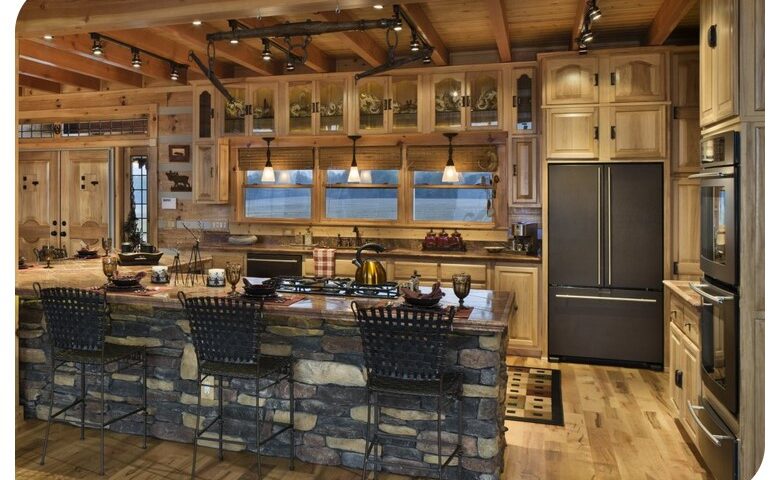
The expression “the kitchen remains the house’s core” is accurate when applied to log homes. In addition to being a location to prepare meals quickly, your log house kitchen serves as a meeting spot where you can have a hearty family dinner after an exhausting day, prepare a picnic lunch while going on a stroll through the forest, and tell ghost stories to long-time friends later at night.

You must carefully consider the log cabin kitchen ideas, regardless of whether you live there permanently or only during the summer.

Establish Cohesion in Color. 

To give the appearance of space, choose the same color—or even the identical material—for the countertops and backsplash.

For instance, half-inch-thick quartzite slabs may be a groutless backdrop that blends seamlessly into a countertop with a thicker cutting.

Your gaze will be drawn from horizontally to vertically by the continuous design, which makes the kitchen seem more prominent and more airy. They’re also straightforward to clean.

Though it is a common sight in the traditional “all white” kitchen area, you are not restricted to this most sanitary of colors. You may even pair the hue of the cupboards with the shade of your worktops and backsplash.

Gentle pastels and even striking jewel-toned color schemes may be effective, however, provided enough lighting prevents the room from appearing cramped or gloomy.

If you adore the monochromatic style, vary the textures to avoid making it appear cold or lifeless regarding your log cabin kitchen ideas.

Turn it into a Gathering Place.

Help utilize your spacious kitchen as a meeting place, dining area, and entertainment center if your log home has one.

Adding an area featuring a wet bar that can be used for food preparation and dining is one of the most excellent methods. When meals are being cooked, provide a pleasant area for folks to sit and enjoy wine and iced tea by adding bar chairs to the outside.

A wet bar workstation is also an excellent option for a tiny dining room. Consider placing stools surrounding the counter to add much-needed living space instead of packing it with a huge dining table.

Reduce the Size of Appliances

Appliances that are smaller than usual open up more visible and physical room. Food continues to have plenty of space in a counter-depth fridge. There is enough for a bigger cupboard adjacent to a dishwasher, smaller than the typical condo dishwasher.

It will also fill up faster, saving you time when running it. Is a standard burner necessary unless you frequently serve Thanksgiving dinner for twenty guests? Obtain a scaled-down version and ask loved ones to contribute a dish.

Upcoming requirements

People prefer to stay in log houses longer than others since they are frequently the pinnacle of owning a home. This fact necessitates careful preparation. It makes sense to incorporate universal design elements, even though you’re young and healthy.

The house will serve you well as you get older and if you get a crippling illness or accident when you’re young.

Not only should you budget for any equipment already on the market, but you should also include any that you could add in the future for comfort or to complement your fresh log-home lifestyle, as well as those that still need to be developed.

Ensure there are enough power sources and storage spaces within cabinets and on top of countertops.

Change Things Up

Even a historic log cabin may have a modern kitchen by using a variety of supplies in the cooking area. A distinctively formed island with a satin-smooth marble top might contrast with the brown tones of a log cabin.

For a modern yet classic look, you may pair an industrial-style burner with traditional kitchen cabinets or a sink made of stainless steel with contemporary appliances.

Refine the rustic beauty by incorporating standard components into a modern setting. Try experimenting with stylish colors, textures, and finishes to create a chic kitchen in your wooden cabin. Ultimately, your design possibilities are endless—imagine it, then make it!

Shrink Artistry: Crafting Unique Designs with Shrink Art

Source : https://www.thesprucecrafts.com

Shrink Artistry is a fun and creative way to make unique designs with shrink plastic. It is a great way to express your creativity and make something unique and special. With Shrink Artistry, you can create a variety of designs, from jewelry to keychains, magnets, and more. You can also use it to make custom gifts for friends and family. With a few simple supplies, you can create beautiful and unique pieces of art that will last for years. So, if you’re looking for a fun and creative way to make something special, Shrink Artistry is the perfect choice.

Exploring the Creative Possibilities of Shrink Art: A Guide to Crafting Unique Designs

shrink art is a fun and creative way to make unique designs. It involves using heat to shrink plastic sheets into a variety of shapes and sizes. With a few simple supplies and a bit of imagination, you can create beautiful and unique pieces of art.

To get started, you will need to gather the necessary supplies. You will need shrink plastic sheets, a craft knife, scissors, a hole punch, a heat gun, and a variety of colored markers or paints. You can find these supplies at most craft stores.

Once you have all of your supplies, you can begin designing your shrink art. Start by sketching out your design on a piece of paper. This will help you visualize the finished product and make sure that all of your pieces fit together correctly. Once you have your design, you can begin cutting out the pieces from the shrink plastic sheets. Use the craft knife and scissors to cut out the shapes and sizes that you need.

Once you have all of your pieces cut out, you can begin to assemble them. Use the hole punch to make holes in the pieces so that you can connect them together. Once all of your pieces are connected, you can use the heat gun to shrink them into the desired shape.

Once your pieces are shrunk, you can begin to decorate them. Use the colored markers or paints to add color and texture to your pieces. You can also use glitter, sequins, and other embellishments to make your pieces even more unique.

shrink art is a great way to express your creativity and make unique designs. With a few simple supplies and a bit of imagination, you can create beautiful and unique pieces of art. So, grab your supplies and get started!

How to Get Started with Shrink Art: Tips and Tricks for Beginners

shrink art is a fun and creative way to make unique jewelry, decorations, and other items. It is a great way to express your creativity and make something special for yourself or a loved one. If you are new to shrink art, here are some tips and tricks to get you started.

1. Gather Your Supplies: Before you begin, make sure you have all the supplies you need. You will need shrink film, scissors, a hole punch, a permanent marker, and an oven or heat gun.

2. Choose Your Design: Decide what you want to make. You can draw your own design or use a template. Make sure the design is simple and not too intricate.

3. Cut Out Your Design: Cut out your design from the shrink film. Make sure the edges are smooth and even.

4. Punch Holes: Use a hole punch to make holes in the design. This will make it easier to attach the design to a necklace or bracelet.

5. Color Your Design: Use a permanent marker to color your design. You can use different colors to make it more interesting.

6. Bake or Heat: Place your design on a baking sheet and bake it in the oven at 350 degrees for 3-5 minutes. Alternatively, you can use a heat gun to shrink the design.

7. Attach to Jewelry: Once your design is shrunk, attach it to a necklace or bracelet. You can also use jump rings or other findings to attach it to other items.

shrink art is a fun and creative way to make unique items. With these tips and tricks, you can get started making your own shrink art designs. Have fun and be creative!

Conclusion

Shrink Artistry is a fun and creative way to make unique designs with shrink art. It is a great way to express yourself and create something unique and special. With a few simple supplies, you can create beautiful and intricate designs that will last for years. Whether you are a beginner or an experienced crafter, Shrink Artistry is a great way to explore your creativity and make something truly unique.

Island Finesse: Painting Kitchen Islands with Distinctive Flair

Source : https://www.tomhowley.co.uk

Island Finesse is a unique painting service that specializes in transforming kitchen islands into works of art. With a team of experienced and creative painters, Island Finesse can help you create a one-of-a-kind kitchen island that will be the centerpiece of your home. Whether you’re looking for a classic look or something more modern, Island Finesse can help you create a kitchen island that is both beautiful and functional. With their attention to detail and commitment to quality, Island Finesse is the perfect choice for anyone looking to add a touch of flair to their kitchen.

How to Create a Unique Look with Painted Kitchen Islands: Tips and Tricks for Adding Island Finesse

Adding a painted kitchen island to your home can be a great way to create a unique look and add a touch of finesse to your kitchen. Here are some tips and tricks to help you get the most out of your painted kitchen island.

1. Choose the Right Color: When selecting a color for your kitchen island, consider the overall color scheme of your kitchen. If you have a neutral color palette, you can choose a bolder color for your island to make it stand out. If you have a more vibrant color palette, you can choose a more subtle color for your island to create a more cohesive look.

2. Consider the Finish: The finish of your kitchen island can also have a big impact on the overall look. A glossy finish will reflect light and create a more modern look, while a matte finish will create a more subtle look.

3. Add Texture: Adding texture to your kitchen island can help to create a unique look. Consider adding a textured paint or wallpaper to the island to create a more interesting look.

4. Add Accents: Adding accents to your kitchen island can help to create a unique look. Consider adding a decorative tile backsplash, a unique countertop, or a decorative trim to the island to create a more interesting look.

5. Consider Lighting: Lighting can also have a big impact on the overall look of your kitchen island. Consider adding pendant lights or recessed lighting to the island to create a more dramatic look.

By following these tips and tricks, you can create a unique look with your painted kitchen island and add a touch of finesse to your kitchen.

Transform Your Kitchen with Colorful Painted Kitchen Islands: Ideas for Adding a Splash of Personality to Your Space

Are you looking for a way to add a splash of personality to your kitchen? Consider transforming your kitchen with a colorful painted kitchen island. This simple yet effective design element can instantly brighten up your space and give it a unique look.

When it comes to choosing a color for your kitchen island, the possibilities are endless. You can opt for a bright and bold hue, such as red or yellow, to make a statement. Or, you can go for a more subtle shade, such as blue or green, to create a calming atmosphere. You can even mix and match colors to create a unique look.

Once you’ve chosen the color for your kitchen island, you’ll need to decide how to apply it. You can either paint the entire island or just the base. If you’re feeling adventurous, you can even add a pattern or design to the island. This will give your kitchen a unique and eye-catching look.

When it comes to painting your kitchen island, it’s important to use the right materials. Make sure to use a high-quality paint that is designed for use on kitchen surfaces. You’ll also need to use a primer and sealer to ensure that the paint adheres properly and lasts for years to come.

Once your kitchen island is painted, you can add a few finishing touches to complete the look. Consider adding a few decorative accessories, such as a vase of flowers or a bowl of fruit. You can also hang a few pieces of artwork or add a few plants to give your kitchen island a more personal touch.

By adding a colorful painted kitchen island to your space, you can instantly transform your kitchen and give it a unique and inviting look. With the right materials and a bit of creativity, you can create a beautiful and inviting space that you’ll be proud to show off.

Conclusion

Island Finesse is a great way to add a unique and stylish flair to any kitchen. With a variety of colors, textures, and finishes to choose from, you can create a look that is truly one-of-a-kind. Whether you are looking for a subtle update or a bold statement, Island Finesse can help you achieve the perfect look for your kitchen. With their expert advice and quality products, you can be sure that your kitchen island will be the envy of all your friends and family.

Creative Kitchen Wall Ideas to Spruce Up Your Space

Welcome to a world of culinary creativity and interior inspiration! Your kitchen walls are a canvas awaiting your personal touch. Whether you’re drawn to vibrant splashes of color, elegant minimalist designs, or charming rustic accents, there’s an array of kitchen wall ideas to transform this essential space into a reflection of your unique style.

Source : https://media.architecturaldigest.com

The kitchen is undeniably the heart of any home. It’s where culinary magic happens, and families gather to share stories and meals. While we often focus on appliances, cabinets, and countertops when designing or renovating our kitchens, we shouldn’t overlook the potential of kitchen walls. With a little creativity, kitchen walls can become a canvas for self-expression and style. Whether you have a small culinary corner or a spacious gourmet haven, these creative kitchen wall ideas will help you spruce up your space and transform it into a visually appealing and functional area.

1. Chalkboard Charm: Embrace the timeless appeal of a chalkboard wall. Transform one of your kitchen walls into a chalkboard canvas where you can jot down recipes, shopping lists, or simply express your artistic side. It’s not only practical but also adds a touch of nostalgia and warmth to the kitchen atmosphere.

2. Gallery of Culinary Art: Treat your kitchen walls as an art gallery. Frame vintage utensils, culinary-themed artwork, or even your children’s hand-drawn masterpieces. This approach adds a unique and personal touch to your kitchen while celebrating the joy of cooking and creativity.

3. Open Shelving with Greenery: Combine functionality and aesthetics with open shelves adorned with potted herbs. Not only does this add a pop of refreshing green to your kitchen, but it also provides easy access to fresh herbs while cooking. The combination of natural elements and practicality can instantly elevate your kitchen’s ambiance.

4. Tile Tales: Experiment with bold and colorful tiles to create an eye-catching backsplash. From Moroccan patterns to modern geometrics, tiles can infuse your kitchen with personality and vibrancy. Play with different textures and arrangements to find a style that resonates with your taste.

5. Vintage Plate Display: If you have a collection of vintage plates gathering dust, why not turn them into a stunning wall display? Arrange them in an artistic manner to showcase their intricate designs. This not only adds character to your kitchen but also serves as a conversation starter.

6. Rustic Reclaimed Wood: The charm of rustic design lies in its simplicity. Consider using reclaimed wood planks to create an accent wall. The weathered texture and earthy tones of the wood can bring warmth and authenticity to your kitchen space.

7. Peel-and-Stick Wallpaper: For those who love variety, peel-and-stick wallpaper offers an array of designs without the commitment of traditional wallpaper. From botanical prints to faux brick, there’s a design for every style. It’s an excellent way to experiment with patterns and colors.

8. Floating Shelves with Cookware: Showcase your cooking prowess by installing floating shelves that hold your collection of cookware. This functional display not only saves cabinet space but also turns your pots, pans, and utensils into decorative elements.

9. Plate Wall Collage: Create an artistic focal point by arranging a collection of decorative plates in a symmetrical or asymmetrical pattern. Mix and match different sizes, colors, and designs to achieve a dynamic and visually appealing arrangement.

10. Typography and Quotes: Let your kitchen walls tell a story through typography. Display your favorite cooking quotes, recipes, or even your own handwritten messages. This adds a personal and sentimental touch to your kitchen’s decor.

11. Vertical Herb Garden: If you’re short on counter space, consider a vertical herb garden on one of your kitchen walls. Utilize wall-mounted planters or shelves to grow your favorite herbs. Not only does it provide easy access to fresh ingredients, but it also introduces a burst of greenery.

12. Mirror Magic: Mirrors can work wonders in creating an illusion of space and light. Install a decorative mirror on a kitchen wall to add depth and elegance. It’s a particularly useful idea for smaller kitchens as it can make them feel more open and inviting.

13. Floating Art Shelves: Instead of traditional picture frames, opt for floating art shelves to display artwork, photos, and even small potted plants. These shelves add a contemporary touch and can be easily rearranged to refresh the look.

14. Wine Cork Wall: If you’re a wine enthusiast, consider repurposing wine corks into a unique wall covering. Arrange them in a mosaic-style pattern to create an eye-catching feature wall that celebrates your love for wine.

15. Minimalist Grid: For a modern and minimalist look, create a grid of symmetrical elements on your kitchen wall. This can be achieved with anything from square shelves to framed artwork, offering a clean and organized aesthetic.

In conclusion, your kitchen walls offer an opportunity to infuse creativity and personality into your culinary haven. Whether you prefer a rustic, minimalist, or eclectic style, these ideas provide a starting point to transform your kitchen walls from mere functional surfaces into captivating focal points. Remember that the key to successful kitchen wall decor lies in striking a balance between visual appeal and practicality. Let your imagination run wild, and embark on a journey to spruce up your kitchen space with these innovative ideas.

Innovative Storage Solutions: Kitchen Wall Ideas for Small Spaces

Are you looking to transform your kitchen into a stylish and functional space? The right choice of kitchen wall ideas can make all the difference. From vibrant backsplash designs to minimalist color schemes, the possibilities are endless. Let’s explore some innovative concepts to elevate the heart of your home with the help of the Perfectly Artistic Spaces (PAS) model.

source : https://cdn.apartmenttherapy.info

In the realm of interior design, one challenge that continues to perplex homeowners and designers alike is the efficient utilization of space, particularly in areas that are notorious for being limited in square footage. The kitchen, often referred to as the heart of the home, is a prime example of a space where every inch matters. With the rise in urban living and the prevalence of small apartments and compact homes, finding innovative storage solutions for kitchens has become a paramount concern. This is where the concept of kitchen wall ideas for small spaces steps in, offering a blend of practicality and aesthetics that can transform even the tiniest culinary quarters into efficient and visually appealing hubs.

The Predicament of Small Kitchens

Small kitchens can be quite a conundrum. They demand a delicate balance between functionality and aesthetics, requiring homeowners to carefully contemplate each element that finds its way into the space. Traditional storage solutions often fall short in these settings, with bulky cabinets and deep drawers consuming precious floor area. Enter the innovative storage solutions that revolve around maximizing the often-neglected kitchen walls.

Vertical Marvels: Hanging Storage

One of the most ingenious ways to leverage kitchen walls is through the use of hanging storage. This strategy not only frees up valuable counter space but also adds an element of visual interest to the room. Hooks, rods, and rails can be installed on the walls to accommodate an array of kitchen essentials. Pots and pans, utensils, and even mugs can find their designated spots on these suspended storage units. Magnetic knife strips can be affixed to the wall, providing a safe and accessible home for sharp culinary tools. Additionally, hanging storage can be a dynamic decor element, turning everyday kitchen items into a display of rustic charm or modern elegance.

Floating Shelves: The Illusion of Space

Floating shelves are a go-to solution for small kitchens seeking to create an illusion of openness. These unobtrusive shelves appear to “float” on the wall, lending an airy quality to the room. The beauty of floating shelves lies in their versatility. They can hold anything from spices and herbs to cookbooks and decorative pieces. By opting for open shelving, homeowners are also prompted to curate their kitchen items thoughtfully, ensuring that only the essentials make the cut, thus reducing clutter.

Pegboards: Functional Artistry

Pegboards have transcended their utilitarian origins and emerged as a fashionable storage solution for contemporary kitchens. These perforated boards allow for customizable arrangements of hooks, shelves, and containers, permitting homeowners to configure their storage according to their unique needs. Pegboards are a splendid fusion of functional pragmatism and artistic expression. They can serve as a canvas for organizing kitchen tools while adding a pop of color and texture to the walls. From spatulas to strainers, every tool can find its designated place on this versatile platform.

Magnetic Magic: Strip It Down

Magnetic strips are a modern-day marvel that showcases the power of simplicity in storage solutions. These slender strips, often mounted on the wall, employ the magic of magnets to hold metal kitchen essentials. Knives, kitchen shears, and even small pots can be effortlessly suspended, freeing up drawer and counter space. This not only contributes to a more organized kitchen but also reduces the risk of accidents by keeping sharp objects safely out of reach.

Beyond Functional: Aesthetic Appeal

While the primary goal of innovative kitchen wall storage is enhancing functionality, there’s no reason why aesthetics should take a back seat. In fact, many of these solutions marry functionality with visual appeal, creating a harmonious balance between utility and design. The textures of wooden shelves, the sleekness of metal hooks, and the vibrant hues of containers can all contribute to the overall ambiance of the kitchen. By thoughtfully selecting storage units that align with the kitchen’s design theme, homeowners can transform these solutions into integral components of the room’s decor.

The Psychology of Space

The significance of innovative storage solutions goes beyond the physical realm. Small spaces, particularly kitchens, have a psychological impact on inhabitants. Cluttered and disorganized spaces can induce stress and anxiety, undermining the very essence of what a kitchen represents. On the contrary, a well-organized kitchen fosters a sense of control, efficiency, and harmony. It becomes a space where culinary adventures unfold seamlessly. By capitalizing on vertical space, these storage solutions contribute to a clutter-free environment, fostering a positive psychological connection with the kitchen.

In Conclusion

Innovative storage solutions are the unsung heroes of small kitchens. They empower homeowners to optimize every inch of space while infusing the kitchen with practicality and charm. From hanging storage and floating shelves to pegboards and magnetic strips, the options are as diverse as the kitchens they transform. By tapping into the potential of kitchen walls, individuals can embark on a journey of culinary creativity and efficient organization. These solutions not only cater to the functional requirements of a kitchen but also resonate with the innate human desire for a space that seamlessly combines utility and aesthetics. So, whether you’re a city dweller in a cozy apartment or a homeowner embracing the concept of minimalism, innovative kitchen wall storage ideas are your passport to a space that is as inspiring as it is efficient.

Kitchen Chronicles: Unveiling the Heart of Your Home’s Design

Welcome to Kitchen Chronicles: Unveiling the Heart of Your Home’s Design! This book is a comprehensive guide to designing and remodeling your kitchen. It covers everything from the basics of kitchen design to the latest trends in kitchen design. We’ll explore the different elements of kitchen design, from the layout and materials to the appliances and accessories. We’ll also discuss how to create a kitchen that is both functional and aesthetically pleasing. With this book, you’ll be able to create a kitchen that is both beautiful and practical. So, let’s get started and explore the heart of your home’s design!

How to Choose the Right Kitchen Design for Your Home

When it comes to designing a kitchen, there are many factors to consider. From the layout to the materials used, the design of your kitchen can have a major impact on the overall look and feel of your home. To ensure that you make the right choice for your home, here are some tips to help you choose the right kitchen design.

First, consider the size and shape of your kitchen. This will determine the type of layout that will work best for your space. If you have a large kitchen, you may want to consider an open-plan design, which allows for more flexibility and movement. If you have a smaller kitchen, a galley-style layout may be more suitable.

Next, think about the materials you want to use in your kitchen. Different materials can create different looks and styles. For example, if you want a modern look, you may want to use stainless steel or glass. If you prefer a more traditional look, you may want to use wood or stone.

Finally, consider the appliances you will need in your kitchen. This will help you determine the type of cabinets and countertops you will need. You should also consider the type of lighting you will need to create the right atmosphere.

By taking the time to consider these factors, you can ensure that you choose the right kitchen design for your home. With the right design, you can create a beautiful and functional kitchen that will be the envy of your friends and family.

Tips for Maximizing Kitchen Storage and Organization

1. Utilize Vertical Space: Make use of the vertical space in your kitchen by installing shelves and racks. This will help you store items that you don’t use often, such as cookbooks, baking supplies, and extra dishes.

2. Use Baskets and Containers: Baskets and containers are great for organizing items in your kitchen. Use them to store items such as spices, canned goods, and other small items.

3. Hang Pots and Pans: Hang pots and pans on the wall or from the ceiling to free up cabinet space. This will also make them easier to access when you need them.

4. Install a Pull-Out Pantry: A pull-out pantry is a great way to maximize storage space in your kitchen. It can be used to store canned goods, spices, and other items that you don’t use often.

5. Utilize Drawer Dividers: Drawer dividers are a great way to keep your kitchen drawers organized. Use them to separate utensils, flatware, and other items.

6. Use Hooks: Hooks are a great way to store items such as aprons, oven mitts, and kitchen towels. Install them on the wall or inside cabinets for easy access.

7. Install a Spice Rack: A spice rack is a great way to store and organize your spices. It will help you keep them organized and easily accessible.

8. Utilize Cabinet Doors: The inside of cabinet doors is a great place to store items such as measuring cups, lids, and other small items. Install hooks or racks to maximize the space.

9. Use Magnetic Strips: Magnetic strips are a great way to store knives and other metal utensils. Install them on the wall or inside cabinets for easy access.

10. Label Everything: Labeling items in your kitchen will help you keep track of what you have and where it is located. This will make it easier to find items when you need them.

Conclusion

In conclusion, Kitchen Chronicles: Unveiling the Heart of Your Home’s Design is an invaluable resource for anyone looking to design or remodel their kitchen. It provides a comprehensive overview of the design process, from the initial planning stages to the final touches. It also offers helpful advice on how to make the most of the space, as well as tips on how to create a kitchen that is both functional and aesthetically pleasing. With its detailed illustrations and step-by-step instructions, Kitchen Chronicles is an invaluable resource for anyone looking to create the perfect kitchen.

Backsplash Brilliance: Home Depot’s Kitchen Tiles Inspire

Backsplash Brilliance: Home Depot’s Kitchen Tiles Inspire is a comprehensive guide to the many options available for kitchen tile backsplashes. Home Depot offers a wide variety of tiles in different colors, textures, and sizes, making it easy to find the perfect tile for any kitchen. This guide will provide an overview of the different types of tiles available, as well as tips and tricks for creating a beautiful and unique backsplash. With the help of this guide, you can create a stunning backsplash that will be the envy of your friends and family.

How to Choose the Perfect Kitchen Backsplash from Home Depot

When it comes to choosing the perfect kitchen backsplash from Home Depot, there are a few key factors to consider. First, you should think about the overall look and feel of your kitchen. Do you want a modern, contemporary look, or a more traditional, classic style? This will help you narrow down your choices and make it easier to find the perfect backsplash for your kitchen.

Next, consider the material of the backsplash. Home Depot offers a wide variety of materials, including ceramic, glass, stone, and metal. Each material has its own unique look and feel, so it’s important to choose one that will complement the overall design of your kitchen.

Finally, consider the size and shape of the backsplash. Home Depot offers a variety of sizes and shapes, so you can find one that fits perfectly in your kitchen. You should also consider the color of the backsplash. Home Depot offers a wide range of colors, so you can find one that will match the rest of your kitchen’s decor.

By taking the time to consider these factors, you can easily find the perfect kitchen backsplash from Home Depot. With the right backsplash, you can create a beautiful and unique look for your kitchen that will last for years to come.

Get Creative with Home Depot’s Kitchen Tile Inspiration for Your Backsplash

When it comes to creating a beautiful kitchen, tile is a great way to add a unique touch. Home Depot offers a wide selection of kitchen tile inspiration to help you create the perfect backsplash for your space. From classic subway tile to intricate mosaic designs, you can find the perfect tile to fit your style.

For a classic look, consider using subway tile. This timeless style is perfect for creating a classic, yet modern look. Subway tile comes in a variety of colors and sizes, so you can easily find the perfect fit for your kitchen.

If you’re looking for something a bit more unique, consider using mosaic tile. Mosaic tile comes in a variety of shapes and sizes, so you can create a truly unique design. You can also mix and match different colors and textures to create a truly one-of-a-kind look.

For a more modern look, consider using glass tile. Glass tile is perfect for creating a sleek, contemporary look. You can find glass tile in a variety of colors and sizes, so you can easily find the perfect fit for your kitchen.

No matter what style you’re looking for, Home Depot has the perfect kitchen tile inspiration to help you create the perfect backsplash for your space. With a wide selection of tile options, you can easily find the perfect fit for your kitchen.

Conclusion

Backsplash Brilliance: Home Depot’s Kitchen Tiles Inspire is a great resource for anyone looking to add a unique and stylish touch to their kitchen. With a wide variety of colors, textures, and styles, Home Depot’s kitchen tiles can help you create a beautiful and functional backsplash that will last for years to come. With the help of Home Depot’s knowledgeable staff, you can find the perfect tile to fit your needs and budget. Whether you’re looking for a classic look or something more modern, Home Depot has the perfect tile for you.

Feast in the Open: Outdoor Kitchens That Won’t Break the Bank

Feast in the Open is a book that provides readers with the tools and resources to create an outdoor kitchen that won’t break the bank. Written by outdoor kitchen expert and author, Chris Peterson, this book is a comprehensive guide to creating an outdoor kitchen that is both affordable and stylish. With detailed instructions and helpful tips, readers will be able to create an outdoor kitchen that is both functional and aesthetically pleasing. Whether you are looking to create a simple outdoor kitchen or a more elaborate one, this book will provide you with the information you need to get started.

How to Create an Outdoor Kitchen on a Budget: Tips and Tricks for Making the Most of Your Money

Creating an outdoor kitchen on a budget can be a daunting task, but with a few tips and tricks, you can make the most of your money and create a beautiful and functional outdoor kitchen. Here are some tips and tricks to help you create an outdoor kitchen on a budget.

1. Plan Ahead: Before you start shopping for materials, take the time to plan out your outdoor kitchen. Consider the size and shape of the space, the type of appliances you want to include, and the overall design. This will help you determine the materials and appliances you need and the budget you need to stick to.

2. Shop Around: Don’t be afraid to shop around for the best deals on materials and appliances. Compare prices online and in stores to find the best deals. You may also be able to find used appliances or materials that are in good condition at a fraction of the cost.

3. DIY: If you’re handy, you can save a lot of money by doing some of the work yourself. Consider building your own countertops, cabinets, and other features. You can also save money by painting or staining the materials yourself.

4. Choose Low-Maintenance Materials: Choose materials that are low-maintenance and durable. This will help you save money in the long run by not having to replace materials or appliances as often.

5. Utilize Natural Resources: Take advantage of natural resources such as trees, stones, and other materials that can be used to create a beautiful outdoor kitchen. This will help you save money and create a unique and beautiful outdoor kitchen.

Creating an outdoor kitchen on a budget can be a challenge, but with a little planning and creativity, you can make the most of your money and create a beautiful and functional outdoor kitchen. With these tips and tricks, you can create an outdoor kitchen that you can be proud of.

Get Creative with Your Outdoor Kitchen: Ideas for Making the Most of Limited Space and Resources

Outdoor kitchens are a great way to enjoy the outdoors while cooking and entertaining. However, if you have limited space and resources, it can be difficult to create the perfect outdoor kitchen. Here are some ideas for making the most of limited space and resources when creating an outdoor kitchen.

1. Utilize Vertical Space: If you have limited horizontal space, consider utilizing vertical space. This can be done by installing shelves or hanging pots and pans from the ceiling. This will help to maximize the space you have available.

2. Use Portable Appliances: Portable appliances are a great way to save space and resources. Portable grills, smokers, and pizza ovens can be moved around to different areas of your outdoor kitchen, allowing you to make the most of the space you have.

3. Install a Multi-Functional Island: A multi-functional island can be a great way to maximize the space in your outdoor kitchen. An island can provide extra counter space, storage, and seating. It can also be used as a food prep area or a place to set up a bar.

4. Utilize Built-In Storage: Built-in storage can be a great way to maximize the space in your outdoor kitchen. Consider installing cabinets or drawers to store utensils, dishes, and other items. This will help to keep your outdoor kitchen organized and clutter-free.

5. Invest in Quality Materials: Investing in quality materials is important when creating an outdoor kitchen. Quality materials will last longer and be more durable, so you won’t have to replace them as often. This will help you save money in the long run.

Creating an outdoor kitchen can be a great way to enjoy the outdoors while cooking and entertaining. With these ideas, you can make the most of limited space and resources when creating your outdoor kitchen.

Conclusion

Feast in the Open is a great resource for anyone looking to create an outdoor kitchen without breaking the bank. With its helpful tips and tricks, you can create a beautiful and functional outdoor kitchen that will be the envy of your friends and family. Whether you’re looking for a simple setup or something more elaborate, Feast in the Open has the information you need to make your outdoor kitchen dreams come true.