Earring Elegance: DIY Earring Display Ideas for Your Jewelry Collection

Source : https://www.wikihow.com

Welcome to Earring Elegance! Here, you will find a variety of DIY earring display ideas to help you organize and showcase your jewelry collection. Whether you’re looking for a simple way to store your earrings or a creative way to show them off, we have the perfect solution for you. From hanging earring holders to wall-mounted displays, we have a variety of options to choose from. With our easy-to-follow instructions, you can create a beautiful display that will make your earrings look their best. So, let’s get started and find the perfect display for your earrings!

Creative Ways to Showcase Your Earring Collection: DIY Earring Display Ideas

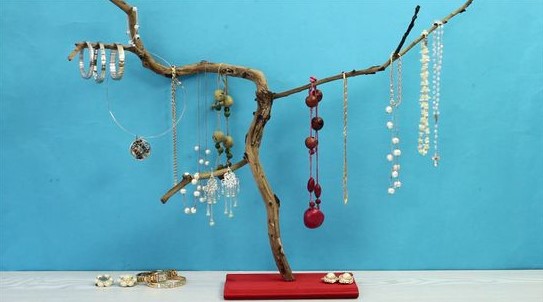
As an avid earring collector, you may be looking for creative ways to showcase your collection. DIY earring displays are a great way to show off your favorite pieces and add a unique touch to your home. Here are some ideas to get you started.

1. Hang a Ladder: A ladder is a great way to display your earrings in an eye-catching way. Hang the ladder on the wall and use the rungs to hang your earrings. You can also add a few decorative items to the ladder to give it a more personalized look.

2. Use a Picture Frame: A picture frame is a great way to display your earrings in a creative way. Simply remove the glass from the frame and use the backing to hang your earrings. You can also add a few decorative items to the frame to give it a more personalized look.

3. Create a Wall Collage: Create a wall collage with your earrings. Use a variety of frames and sizes to create a unique look. You can also add a few decorative items to the collage to give it a more personalized look.

4. Hang a Curtain Rod: Hang a curtain rod on the wall and use it to hang your earrings. You can also add a few decorative items to the rod to give it a more personalized look.

5. Use a Bulletin Board: A bulletin board is a great way to display your earrings in an organized way. Simply attach your earrings to the board with pins or magnets. You can also add a few decorative items to the board to give it a more personalized look.

These are just a few ideas to get you started. With a little creativity, you can create a unique and eye-catching display for your earring collection.

How to Make a Stylish Earring Display for Your Home: DIY Projects for Earring Elegance

Creating a stylish earring display for your home is a great way to show off your favorite pieces and add a touch of elegance to any room. With a few simple materials and a bit of creativity, you can create a beautiful and unique display that will be the envy of all your friends. This guide will provide step-by-step instructions on how to make a stylish earring display for your home.

Materials Needed:

-Picture frame

-Fabric or paper

-Scissors

-Glue

-Earring hooks

-Ribbon

Instructions:

1. Begin by selecting a picture frame that will fit the size and style of your earrings. Make sure the frame is large enough to accommodate the number of earrings you plan to display.

2. Cut a piece of fabric or paper to fit the frame. Glue the fabric or paper to the back of the frame.

3. Measure and mark the spots where you will place the earring hooks. Make sure the hooks are evenly spaced and secure.

4. Attach the earring hooks to the frame.

5. Hang the frame on the wall and add your earrings.

6. For a more decorative look, add a ribbon around the frame.

Your stylish earring display is now complete! With a few simple materials and a bit of creativity, you can create a beautiful and unique display that will be the envy of all your friends. Enjoy your new earring display and show off your favorite pieces with pride.Earring Elegance provides a great way to store and display your jewelry collection. With a variety of DIY earring display ideas, you can easily create a unique and stylish display that will show off your earrings in the best way possible. Whether you choose to hang them on a wall, display them in a box, or use a jewelry tree, you can be sure that your earrings will be showcased in a beautiful and organized way.

Turkey Time Fun: Thanksgiving Crafts for Toddlers to Spark Creativity

Source : https://hips.hearstapps.com

Turkey Time Fun: Thanksgiving Crafts for Toddlers is the perfect way to get your little ones excited about the upcoming holiday season. With easy-to-follow instructions and fun activities, your toddlers will be able to create their own unique Thanksgiving decorations and crafts. From paper turkeys to handprint turkeys, these crafts will spark creativity and help your toddlers learn about the importance of Thanksgiving. With these fun and easy crafts, your toddlers will be able to express their creativity and have a blast while doing it.

Get Creative with Thanksgiving Crafts for Toddlers: Ideas to Inspire Imagination

Thanksgiving is a wonderful time to get creative with crafts for toddlers. Crafting activities can help to stimulate a child’s imagination and provide an opportunity for them to express themselves. Here are some ideas to inspire creativity and help toddlers to create their own Thanksgiving-themed crafts.

One fun craft idea is to make a Thanksgiving turkey. This can be done by cutting out a large turkey shape from construction paper and having the toddler decorate it with feathers, googly eyes, and other colorful items. The turkey can then be hung up as a decoration or used as a centerpiece for the Thanksgiving table.

Another craft idea is to make a Thanksgiving wreath. This can be done by having the toddler glue colorful leaves, feathers, and other items onto a paper plate. The wreath can then be hung up as a decoration or used as a centerpiece for the Thanksgiving table.

A third craft idea is to make a Thanksgiving placemat. This can be done by having the toddler paint a paper plate with fall colors and then glue on leaves, feathers, and other items. The placemat can then be used to decorate the Thanksgiving table.

Finally, a fourth craft idea is to make a Thanksgiving card. This can be done by having the toddler draw a picture of a turkey or other Thanksgiving-themed item on a piece of paper. The card can then be decorated with markers, glitter, and other items. The card can then be given to family and friends as a special Thanksgiving greeting.

These are just a few ideas to get creative with Thanksgiving crafts for toddlers. With a little imagination and creativity, toddlers can create their own unique Thanksgiving-themed crafts that will be sure to bring a smile to everyone’s face.

Fun and Easy Thanksgiving Crafts for Toddlers: Keep Little Hands Busy During Turkey Time Fun

Thanksgiving is a time for family, friends, and fun. For toddlers, it can be a great opportunity to get creative and explore their artistic side. Here are some fun and easy Thanksgiving crafts that toddlers can do to keep their little hands busy during turkey time.

1. Handprint Turkey: This classic craft is a great way to get toddlers involved in the Thanksgiving festivities. All you need is some construction paper, paint, and a few other supplies. Have your toddler dip their hand in paint and press it onto the paper to create the turkey’s body. Then, add some feathers, a beak, and a wattle to complete the turkey.

2. Paper Plate Turkey: This craft is a great way to use up any extra paper plates you may have lying around. Cut out a paper plate in the shape of a turkey and have your toddler decorate it with feathers, eyes, and a beak. You can also add some googly eyes or other decorations to make it extra special.

3. Thanksgiving Tree: This craft is a great way to get your toddler involved in the holiday spirit. Cut out a tree shape from construction paper and have your toddler glue on leaves, acorns, and other fall decorations. You can also add some glitter or other embellishments to make it extra special.

4. Turkey Hat: This craft is a great way to get your toddler involved in the holiday spirit. Cut out a turkey shape from construction paper and have your toddler decorate it with feathers, eyes, and a beak. Then, attach it to a headband or hat to make a fun turkey hat.

These fun and easy Thanksgiving crafts are sure to keep your toddler’s hands busy during turkey time. With a little bit of creativity and some basic supplies, your toddler can create some fun and festive Thanksgiving crafts that will be sure to bring a smile to everyone’s face.Turkey Time Fun: Thanksgiving Crafts for Toddlers to Spark Creativity is a great way to get your little ones excited about the holiday season. With easy-to-follow instructions and materials that are easy to find, these crafts are perfect for toddlers to explore their creativity and have fun. From making a turkey out of paper plates to creating a thankful tree, these crafts are sure to bring a smile to your toddler’s face. So, get your craft supplies ready and let the fun begin!

Thanksgiving Fun for Little Ones: Creative Crafts for Preschoolers

Source : https://parade.com

Thanksgiving is a time for family, friends, and fun! It’s also a great opportunity to get creative with your little ones. If you’re looking for some fun and creative crafts for your preschoolers to do this Thanksgiving, you’ve come to the right place. From turkey-themed crafts to festive decorations, there are plenty of ideas to keep your little ones busy and entertained. With these creative crafts, your preschoolers will have a blast while learning about the holiday and creating something special to share with their family and friends.

10 Easy Thanksgiving Crafts for Preschoolers: Get Creative with Your Little Ones This Holiday Season!

This Thanksgiving, get creative with your preschoolers and make some fun and easy crafts! Here are 10 easy Thanksgiving crafts that your little ones will love:

1. Paper Plate Turkey: Cut out a paper plate in the shape of a turkey and let your preschoolers decorate it with feathers, googly eyes, and other craft materials.

2. Handprint Turkey: Trace your preschooler’s handprint onto a piece of construction paper and cut it out. Glue it onto a larger piece of paper and add a beak, eyes, and feet to make a turkey.

3. Thanksgiving Wreath: Cut out a paper plate in the shape of a wreath and let your preschoolers decorate it with leaves, feathers, and other craft materials.

4. Cornucopia: Cut out a paper plate in the shape of a cornucopia and let your preschoolers decorate it with fruits, vegetables, and other craft materials.

5. Thanksgiving Place Cards: Cut out construction paper in the shape of a turkey and let your preschoolers decorate it with feathers, googly eyes, and other craft materials. Write each guest’s name on the turkey and place it at the table.

6. Thanksgiving Tree: Cut out a tree shape from construction paper and let your preschoolers decorate it with leaves, feathers, and other craft materials.

7. Thanksgiving Banner: Cut out construction paper in the shape of a turkey and let your preschoolers decorate it with feathers, googly eyes, and other craft materials. Hang the banner up in your home.

8. Thanksgiving Centerpiece: Cut out a paper plate in the shape of a turkey and let your preschoolers decorate it with feathers, googly eyes, and other craft materials. Place the centerpiece on your Thanksgiving table.

9. Thanksgiving Cards: Cut out construction paper in the shape of a turkey and let your preschoolers decorate it with feathers, googly eyes, and other craft materials. Write a special message inside and give it to your loved ones.

10. Thanksgiving Garland: Cut out construction paper in the shape of a turkey and let your preschoolers decorate it with feathers, googly eyes, and other craft materials. Hang the garland up in your home.

These easy Thanksgiving crafts are sure to bring a smile to your preschoolers’ faces this holiday season!

Fun and Festive Thanksgiving Crafts for Preschoolers: Ideas to Keep Your Little Ones Busy and Entertained!

Thanksgiving is a wonderful time of year to celebrate with family and friends. It is also a great opportunity to get creative with your preschoolers and have some fun. There are many fun and festive Thanksgiving crafts that can be done with preschoolers to keep them busy and entertained. Here are some ideas to get you started.

1. Turkey Handprint Craft: This is a classic Thanksgiving craft that is sure to be a hit with your preschoolers. All you need is some construction paper, paint, and googly eyes. Have your preschoolers dip their hands in paint and make a handprint on the paper. Once the paint is dry, add googly eyes and a beak to make a turkey.

2. Thanksgiving Place Cards: This craft is a great way to get your preschoolers involved in the Thanksgiving dinner preparations. Have them decorate place cards with markers, crayons, or stickers. They can also write the names of the guests on the cards.

3. Thanksgiving Tree: This craft is a great way to get your preschoolers to think about what they are thankful for. Have them cut out leaves from construction paper and write something they are thankful for on each leaf. Then, have them glue the leaves to a tree shape that you have cut out of construction paper.

4. Thanksgiving Wreath: This craft is a great way to get your preschoolers to think about the colors of fall. Have them cut out circles from construction paper in fall colors. Then, have them glue the circles together to make a wreath shape. Add a bow to the top to finish it off.

5. Thanksgiving Banner: This craft is a great way to decorate for Thanksgiving. Have your preschoolers cut out letters from construction paper to spell out “Happy Thanksgiving”. Then, have them glue the letters to a piece of string or ribbon. Hang the banner up in your home to add a festive touch.

These are just a few ideas for fun and festive Thanksgiving crafts for preschoolers. With a little creativity, you can come up with many more ideas to keep your little ones busy and entertained this Thanksgiving.Thanksgiving Fun for Little Ones: Creative Crafts for Preschoolers is a great way to get your preschoolers involved in the holiday season. With a variety of crafts to choose from, your preschoolers can have fun while learning about the history and traditions of Thanksgiving. From making paper turkeys to creating thankful trees, these crafts are sure to bring a smile to your little ones’ faces. With these creative crafts, your preschoolers will have a memorable Thanksgiving that they will cherish for years to come.

Chalk It Up: How to Make a Chalkboard Frame for Personalized Messages

Source : https://cms.cloudinary.vpsvc.com

Chalk It Up is a fun and creative way to make a personalized chalkboard frame for your home or office. With just a few simple supplies, you can create a unique and stylish piece of art that can be used to write messages, draw pictures, or just display your favorite quotes. This tutorial will walk you through the steps of creating a chalkboard frame, from selecting the right materials to adding the finishing touches. With a little bit of time and effort, you can create a beautiful and unique piece of art that will be sure to impress your friends and family.

DIY Chalkboard Frame: A Step-by-Step Guide to Creating a Customized Message Board

Creating a customized chalkboard frame is a great way to add a unique touch to any room. Whether you’re looking to create a message board for your home or office, this step-by-step guide will help you create a beautiful and functional chalkboard frame.

Materials Needed:

-Wooden frame

-Chalkboard paint

-Paintbrush

-Sandpaper

-Primer

-Tape

-Screwdriver

Step 1: Prepare the Frame

Begin by removing the backing and glass from the frame. Use a screwdriver to remove any screws that may be holding the frame together. Once the frame is disassembled, use sandpaper to smooth out any rough edges.

Step 2: Apply Primer

Once the frame is prepped, apply a coat of primer to the frame. This will help the paint adhere better and create a smoother finish. Allow the primer to dry completely before moving on to the next step.

Step 3: Paint the Frame

Once the primer is dry, it’s time to paint the frame. Use a paintbrush to apply a coat of chalkboard paint to the frame. Allow the paint to dry completely before moving on to the next step.

Step 4: Reassemble the Frame

Once the paint is dry, reassemble the frame. Use tape to secure the backing and glass in place. Make sure the frame is secure before moving on to the next step.

Step 5: Enjoy Your Chalkboard Frame

Your chalkboard frame is now ready to use! Use chalk to write messages, draw pictures, or create a unique design. Enjoy your customized chalkboard frame and get creative!

Get Creative with Chalk It Up: How to Design a Chalkboard Frame for Your Home Decor

Creating a chalkboard frame for your home decor is a great way to add a unique and creative touch to any room. With a few simple supplies and a bit of creativity, you can create a beautiful and functional chalkboard frame that will be the perfect addition to your home.

The first step in creating a chalkboard frame is to choose the right materials. You will need a frame, chalkboard paint, a paintbrush, and a few other supplies. The frame should be made of a sturdy material such as wood or metal, and should be large enough to accommodate the size of the chalkboard you plan to create. Once you have chosen the frame, you can begin to paint it with the chalkboard paint. Make sure to apply the paint evenly and in thin layers, allowing each layer to dry before applying the next.

Once the frame is painted, you can begin to decorate it. You can use stencils to create patterns or designs on the frame, or you can use chalk to draw directly onto the frame. You can also use stickers or other decorative items to add a unique touch to the frame.

Once the frame is decorated, you can attach the chalkboard to the frame. You can use nails or screws to secure the chalkboard to the frame, or you can use adhesive strips. Make sure to use the appropriate hardware for the material of the frame.

Finally, you can hang the chalkboard frame in your home. You can hang it on the wall or place it on a shelf or table. You can also use it as a message board or to display artwork.

Creating a chalkboard frame for your home decor is a great way to add a unique and creative touch to any room. With a few simple supplies and a bit of creativity, you can create a beautiful and functional chalkboard frame that will be the perfect addition to your home.Chalk It Up: How to Make a Chalkboard Frame for Personalized Messages is a great way to add a unique and personal touch to any home or office. With just a few simple supplies and a bit of creativity, anyone can create a beautiful and functional chalkboard frame that can be used to write messages, reminders, or just to add a bit of fun to any space. Whether you’re looking for a fun project to do with the kids or a way to spruce up your home or office, this tutorial is a great way to get started.

DIY Hooks: Creative and Functional Ideas for Organizing Your Space

Source : https://www.thespruce.com

DIY hooks are a great way to add creative and functional storage solutions to any space. Whether you’re looking for a way to organize your kitchen, bedroom, or even your office, DIY hooks can provide a unique and stylish way to keep your items organized. With a few simple materials and tools, you can create a variety of hooks that can be used to hang items such as coats, hats, bags, and even jewelry. DIY hooks are also a great way to add a personal touch to any room, as you can customize them to match your existing decor. With a little creativity and some basic tools, you can create a variety of DIY hooks that will help you keep your space organized and looking great.

10 DIY Hook Ideas to Help You Get Organized and Maximize Your Space

1. Utilize a Pegboard: A pegboard is a great way to maximize wall space and create a functional and organized area. It can be used to hang tools, kitchen utensils, and other items.

2. Install a Magnetic Strip: A magnetic strip is a great way to store items such as knives, scissors, and other metal objects. It can be installed on the wall or inside a cabinet.

3. Hang a Shoe Rack: A shoe rack is a great way to store and organize shoes. It can be hung on the wall or placed on the floor.

4. Use a Wall-Mounted Coat Rack: A wall-mounted coat rack is a great way to store coats, hats, and other items. It can be used in the entryway or in a bedroom.

5. Install a Wall-Mounted Shelf: A wall-mounted shelf is a great way to store items such as books, magazines, and other items. It can be used in the living room, bedroom, or office.

6. Hang a Pot Rack: A pot rack is a great way to store and organize pots and pans. It can be hung on the wall or placed on the floor.

7. Utilize a Wall-Mounted Basket: A wall-mounted basket is a great way to store items such as towels, blankets, and other items. It can be used in the bathroom or bedroom.

8. Install a Wall-Mounted Hook Rack: A wall-mounted hook rack is a great way to store items such as keys, jewelry, and other items. It can be used in the entryway or bedroom.

9. Hang a Wall-Mounted Towel Rack: A wall-mounted towel rack is a great way to store and organize towels. It can be used in the bathroom or bedroom.

10. Utilize a Wall-Mounted Hook: A wall-mounted hook is a great way to store items such as hats, coats, and other items. It can be used in the entryway or bedroom.

Creative and Inexpensive DIY Hook Projects to Help You Declutter Your Home

Decluttering your home can be a daunting task, but with a few creative and inexpensive DIY hook projects, you can easily organize your space and make it look neat and tidy. Here are some ideas to get you started:

1. Hang a Pegboard: A pegboard is a great way to store items like tools, kitchen utensils, and other small items. You can hang it on the wall and use hooks to hang items from it. This is a great way to keep your items organized and easily accessible.

2. Install Hooks on the Wall: Installing hooks on the wall is an easy and inexpensive way to hang items like coats, hats, and bags. You can also use them to hang kitchen utensils, tools, and other items.

3. Hang a Shoe Rack: A shoe rack is a great way to store shoes and keep them organized. You can hang it on the wall or on the back of a door and use hooks to hang the shoes.

4. Hang a Pot Rack: A pot rack is a great way to store pots and pans and keep them organized. You can hang it on the wall or on the ceiling and use hooks to hang the pots and pans.

5. Hang a Basket: A basket is a great way to store items like magazines, books, and other items. You can hang it on the wall or on the back of a door and use hooks to hang the basket.

These are just a few creative and inexpensive DIY hook projects that can help you declutter your home. With a little bit of creativity and some inexpensive materials, you can easily organize your space and make it look neat and tidy.DIY hooks are a great way to add creative and functional organization to any space. They are easy to make, cost-effective, and can be used in a variety of ways. Whether you are looking for a way to hang coats, organize tools, or display artwork, DIY hooks are a great way to get the job done. With a little creativity and some basic supplies, you can create a unique and functional space that is sure to impress.

Speedy Clean: The Fastest Way to Clean House and Enjoy a Tidy Home

Source : https://lemonblossomcleaning.com

Welcome to Speedy Clean, the fastest way to clean your house and enjoy a tidy home. We understand that cleaning can be a daunting task, and that’s why we’ve created a system that makes it easier and faster than ever before. Our system is designed to help you clean your home quickly and efficiently, so you can spend more time doing the things you love. With our simple and effective cleaning methods, you’ll be able to get your home looking spotless in no time. So, let’s get started and make your home sparkle!

How to Clean Your Home Quickly and Easily with Speedy Clean: Tips and Tricks for a Spotless Home

Cleaning your home quickly and easily can be a daunting task, but with the right tips and tricks, you can have a spotless home in no time. Here are some tips and tricks for speedy clean that will help you get the job done quickly and efficiently.

1. Start with the Biggest Messes First: When it comes to cleaning your home, it’s important to start with the biggest messes first. This will help you get the most out of your cleaning time and ensure that you don’t miss any spots.

2. Use the Right Cleaning Products: Using the right cleaning products can make a huge difference in how quickly and easily you can clean your home. Make sure to use products that are designed for the surfaces you’re cleaning and that are safe for your family and pets.

3. Divide and Conquer: Divide your home into sections and tackle each one separately. This will help you stay focused and organized and make sure that you don’t miss any spots.

4. Use a Vacuum: Vacuuming is one of the quickest and easiest ways to clean your home. Make sure to vacuum all carpets, rugs, and upholstery to get rid of dust and dirt.

5. Clean as You Go: Cleaning as you go is a great way to keep your home clean and tidy. Whenever you’re done with a task, take a few minutes to clean up the area before moving on to the next one.

6. Don’t Forget the Details: Don’t forget to clean the small details in your home, such as doorknobs, light switches, and window sills. These areas can easily be overlooked, but they can make a big difference in the overall cleanliness of your home.

By following these tips and tricks for speedy clean, you can have a spotless home in no time. With a little bit of effort and the right cleaning products, you can make sure that your home is always looking its best.

The Benefits of Using Speedy Clean to Keep Your Home Clean and Tidy: Why You Should Make Speedy Clean Part of Your Cleaning Routine

Maintaining a clean and tidy home is essential for creating a healthy and comfortable living environment. Unfortunately, it can be difficult to find the time and energy to keep up with regular cleaning. Speedy Clean is a powerful cleaning product that can help make the task of keeping your home clean and tidy much easier. Here are some of the benefits of using Speedy Clean to keep your home clean and tidy:

1. Time-Saving: Speedy Clean is designed to make cleaning faster and more efficient. It is formulated to quickly break down dirt, grime, and other messes, so you can get the job done quickly and move on to other tasks.

2. Cost-Effective: Speedy Clean is an affordable cleaning solution that can help you save money in the long run. It is designed to be used in small amounts, so you don’t have to buy large quantities of cleaning products.

3. Versatile: Speedy Clean can be used on a variety of surfaces, including tile, wood, and laminate. This makes it a great choice for cleaning a variety of areas in your home.

4. Safe: Speedy Clean is non-toxic and biodegradable, so it is safe to use around children and pets. It is also free of harsh chemicals, so you don’t have to worry about exposing your family to dangerous fumes.

5. Eco-Friendly: Speedy Clean is an environmentally friendly cleaning solution. It is made from natural ingredients and does not contain any harsh chemicals or toxins.

Making Speedy Clean part of your regular cleaning routine can help you keep your home clean and tidy with minimal effort. It is an affordable, safe, and eco-friendly cleaning solution that can help you save time and money while keeping your home looking its best.Speedy Clean is an effective and efficient way to keep your home clean and tidy. It is easy to use and provides a fast and effective way to clean your home. With its simple and straightforward instructions, anyone can quickly learn how to use it and get their home looking spotless in no time. With its affordable price and great results, Speedy Clean is the perfect solution for anyone looking for a fast and effective way to keep their home clean and tidy.

Wreath Magic: A Fabric Wreath Tutorial for DIY Home Decor Enthusiasts

Welcome to Wreath Magic: A Fabric Wreath Tutorial for DIY Home Decor Enthusiasts! If you’re looking for a fun and creative way to spruce up your home decor, then this tutorial is for you. We’ll show you how to make a beautiful fabric wreath that will add a unique touch to any room. With just a few simple supplies and a bit of time, you’ll be able to create a stunning wreath that will be the envy of all your friends. So let’s get started!

How to Create a Unique Fabric Wreath for Your Home Decor

Creating a unique fabric wreath for your home decor is a great way to add a personal touch to your living space. Fabric wreaths are easy to make and can be customized to fit any style. This guide will provide step-by-step instructions on how to create a fabric wreath for your home decor.

Materials Needed:

-Fabric of your choice

-Scissors

-Hot glue gun

-Wire wreath frame

-Ribbon

-Embellishments (optional)

Step 1: Cut the Fabric

Start by cutting the fabric into strips. The strips should be about 1 inch wide and 12 inches long. You will need enough strips to cover the entire wreath frame.

Step 2: Attach the Fabric to the Frame

Using the hot glue gun, attach the fabric strips to the wire wreath frame. Start at the top of the frame and work your way around, overlapping the fabric strips as you go.

Step 3: Add Embellishments (Optional)

If desired, you can add embellishments to the fabric wreath. This could include ribbons, buttons, or other decorative items.

Step 4: Hang the Wreath

Once the fabric wreath is complete, it is ready to be hung. Use a ribbon or string to hang the wreath on a wall or door.

Creating a unique fabric wreath for your home decor is a great way to add a personal touch to your living space. With the right materials and a bit of creativity, you can create a beautiful fabric wreath that will be the perfect addition to your home decor.

Crafting a Custom Fabric Wreath: Tips and Tricks from Wreath Magic

Creating a custom fabric wreath is a great way to add a unique touch to any home décor. With the right materials and a bit of creativity, anyone can craft a beautiful fabric wreath that will be the envy of all who see it. Here are some tips and tricks from Wreath Magic to help you create a stunning fabric wreath.

First, choose the right fabric. You’ll want to select a fabric that is lightweight and easy to work with. Cotton, linen, and muslin are all good choices. You’ll also want to choose a fabric that is durable and won’t fray easily.

Next, decide on the size of your wreath. You can use a pre-made wreath form or make your own. If you’re making your own, you’ll need to measure the circumference of the form and cut your fabric accordingly.

Once you’ve cut your fabric, it’s time to start assembling your wreath. Start by folding the fabric in half lengthwise and then cutting it into strips. The strips should be about 1-2 inches wide. Then, take each strip and fold it in half lengthwise again. This will create a loop.

Now it’s time to attach the loops to the wreath form. Start by tying a knot at the end of each loop and then attach it to the form. You can use a hot glue gun or a needle and thread to secure the loops.

Once all of the loops are attached, you can start to embellish your wreath. You can add ribbons, buttons, beads, or any other decorations you like. You can also use fabric paint to add a unique touch.

Finally, hang your wreath and enjoy your beautiful creation! With these tips and tricks from Wreath Magic, you’ll be able to craft a stunning fabric wreath that will be the envy of all who see it.Wreath Magic: A Fabric Wreath Tutorial for DIY Home Decor Enthusiasts is a great resource for anyone looking to create a unique and beautiful fabric wreath. With easy-to-follow instructions and helpful tips, this tutorial is perfect for beginners and experienced crafters alike. Whether you’re looking to spruce up your home decor or make a special gift for someone, this tutorial will help you create a stunning fabric wreath that will be sure to impress.

Lavender Dreams: Discover the Tranquility of Lavender Paint Colors

Source : https://www.bergerpaints.com

Lavender Dreams is a collection of beautiful lavender paint colors that will bring a sense of tranquility and peace to any home. Whether you are looking to create a calming atmosphere in your bedroom, living room, or bathroom, Lavender Dreams has the perfect shade of lavender to suit your needs. From soft pastels to deep purples, this collection of lavender paint colors will help you create a space that is both inviting and relaxing. With its calming properties, lavender is the perfect choice for creating a peaceful and serene atmosphere in your home. So, if you are looking to add a touch of tranquility to your home, look no further than Lavender Dreams.

How to Create a Relaxing Space with Lavender Paint Colors

Creating a relaxing space with lavender paint colors can be a great way to create a calming atmosphere in any room. Lavender is a soft, muted color that can be used to create a tranquil and peaceful environment. It is also a versatile color that can be used in a variety of ways to create a unique and inviting atmosphere.

When selecting a lavender paint color, it is important to consider the size of the room and the amount of natural light it receives. For smaller rooms, a lighter shade of lavender can be used to create a more airy and open feel. For larger rooms, a darker shade of lavender can be used to create a more intimate and cozy atmosphere. Additionally, the type of lighting used in the room should be taken into consideration when selecting a lavender paint color. Natural light can help to bring out the subtle nuances of the color, while artificial light can make the color appear brighter and more vibrant.

Once the color has been selected, it is important to consider the other elements in the room. Furniture, artwork, and accessories should all be chosen to complement the lavender paint color. Neutral colors such as white, gray, and beige can be used to create a calming and soothing atmosphere. Additionally, adding a few accent pieces in shades of purple or pink can help to bring out the beauty of the lavender paint color.

Finally, it is important to consider the type of finish used on the walls. A matte finish can help to create a more subtle and calming atmosphere, while a glossy finish can help to bring out the vibrancy of the color. Additionally, adding a few layers of paint can help to create a more textured look.

By carefully selecting a lavender paint color and considering the other elements in the room, it is possible to create a relaxing and inviting space. With the right combination of colors, furniture, and accessories, a lavender-painted room can be a great way to create a tranquil and peaceful atmosphere.

The Benefits of Lavender Paint Colors for a Calming Bedroom Retreat

The use of lavender paint colors in a bedroom can create a calming and tranquil atmosphere, making it the perfect retreat for relaxation and rest. Lavender is a soft, muted hue that is associated with peace and tranquility, making it an ideal choice for a bedroom. The color has been shown to reduce stress and anxiety, and can even help to improve sleep quality.

Lavender paint colors can be used to create a soothing and calming atmosphere in the bedroom. The color is known to have a calming effect on the mind and body, and can help to reduce stress and anxiety. Lavender is also known to be a color that promotes relaxation and restfulness, making it the perfect choice for a bedroom.

The use of lavender paint colors can also help to create a sense of balance and harmony in the bedroom. The color is known to be calming and soothing, and can help to create a sense of peace and tranquility. Lavender is also known to be a color that promotes creativity and imagination, making it a great choice for a bedroom.

The use of lavender paint colors can also help to create a sense of warmth and comfort in the bedroom. The color is known to be calming and soothing, and can help to create a cozy and inviting atmosphere. Lavender is also known to be a color that promotes relaxation and restfulness, making it the perfect choice for a bedroom.

The use of lavender paint colors can also help to create a sense of serenity and peace in the bedroom. The color is known to be calming and soothing, and can help to create a peaceful and tranquil atmosphere. Lavender is also known to be a color that promotes relaxation and restfulness, making it the perfect choice for a bedroom.

In conclusion, the use of lavender paint colors in a bedroom can create a calming and tranquil atmosphere, making it the perfect retreat for relaxation and rest. The color is known to be calming and soothing, and can help to reduce stress and anxiety. Lavender is also known to be a color that promotes relaxation and restfulness, making it the perfect choice for a bedroom.Lavender Dreams: Discover the Tranquility of Lavender Paint Colors is a great resource for anyone looking to add a calming and peaceful atmosphere to their home. With its wide range of shades and hues, it is easy to find the perfect lavender paint color to fit any style. Whether you are looking for a subtle hint of lavender or a bold statement, this book provides the perfect inspiration for creating a tranquil and inviting space.

Creative Cinder Blocks: Innovative Ideas for Using Cinder Blocks in Your Space

Source : https://www.creatingreallyawesomefunthings.com

Cinder blocks are a versatile and affordable building material that can be used to create a variety of projects. From furniture to garden walls, cinder blocks can be used to create unique and creative designs. In this article, we will explore some of the innovative ideas for using cinder blocks in your space. From outdoor seating to planters, cinder blocks can be used to create a variety of projects that will add style and function to your outdoor space. We will also discuss the different types of cinder blocks available and how to choose the right one for your project. So, if you’re looking for a creative and affordable way to spruce up your outdoor space, cinder blocks are a great option.

10 Creative Ways to Use Cinder Blocks to Transform Your Home

Cinder blocks are a versatile and affordable building material that can be used to create a variety of structures and designs. From outdoor furniture to interior walls, cinder blocks can be used to transform any home. Here are 10 creative ways to use cinder blocks to transform your home:

1. Create a Fire Pit: Cinder blocks can be used to create a fire pit in your backyard. Stack the blocks in a circle and fill the center with gravel or sand. This is a great way to enjoy a cozy fire with friends and family.

2. Build a Garden Bed: Cinder blocks can be used to create a raised garden bed. Stack the blocks in a square or rectangle and fill the center with soil. This is a great way to grow vegetables and herbs in a small space.

3. Make a Planter: Cinder blocks can be used to make a planter for your favorite flowers or plants. Stack the blocks in a square or rectangle and fill the center with soil. This is a great way to add a pop of color to your outdoor space.

4. Construct a Bench: Cinder blocks can be used to construct a bench for your outdoor space. Stack the blocks in a square or rectangle and fill the center with soil. This is a great way to create a comfortable seating area.

5. Build a Wall: Cinder blocks can be used to build a wall in your home. Stack the blocks in a square or rectangle and fill the center with mortar. This is a great way to create a partition or add privacy to a room.

6. Create a Coffee Table: Cinder blocks can be used to create a unique coffee table. Stack the blocks in a square or rectangle and fill the center with glass or wood. This is a great way to add a modern touch to your living room.

7. Make a Bookshelf: Cinder blocks can be used to make a bookshelf. Stack the blocks in a square or rectangle and fill the center with wood or metal shelves. This is a great way to store books and other items in a stylish way.

8. Construct a Bar: Cinder blocks can be used to construct a bar in your home. Stack the blocks in a square or rectangle and fill the center with wood or metal shelves. This is a great way to entertain guests in style.

9. Build a Grill: Cinder blocks can be used to build a grill in your backyard. Stack the blocks in a square or rectangle and fill the center with charcoal or wood. This is a great way to enjoy a delicious barbecue with friends and family.

10. Make a Pathway: Cinder blocks can be used to make a pathway in your garden or yard. Stack the blocks in a square or rectangle and fill the center with gravel or sand. This is a great way to create a beautiful walkway in your outdoor space.

These are just a few of the creative ways to use cinder blocks to transform your home. With a little imagination and some hard work, you can create a unique and stylish space that is sure to impress.

How to Incorporate Cinder Blocks into Your Garden Design for a Unique Look

Cinder blocks are a versatile and affordable material that can be used to create unique and eye-catching garden designs. With a few simple steps, you can incorporate cinder blocks into your garden design to create a unique and attractive look.

First, decide where you want to place the cinder blocks in your garden. Consider the size and shape of the blocks and how they will fit into the overall design. You may want to use them as a border around a flower bed or as a raised bed for vegetables.

Once you have decided where to place the cinder blocks, you can begin to assemble them. Start by laying the blocks in the desired pattern. Make sure to use a level to ensure that the blocks are even and level. Secure the blocks together with mortar or concrete.

Once the blocks are in place, you can begin to add soil and plants. If you are using the blocks as a raised bed, you can fill the bed with soil and then add plants. If you are using the blocks as a border, you can fill the area between the blocks with soil and then add plants.

Finally, you can add decorative elements to the cinder blocks. You can paint the blocks in a variety of colors or add decorative accents such as stones or shells. You can also add lighting to the blocks to create a unique nighttime look.

By incorporating cinder blocks into your garden design, you can create a unique and attractive look that will be the envy of your neighbors. With a few simple steps, you can transform your garden into a beautiful and unique outdoor space.Creative Cinder Blocks offer a unique and innovative way to add a touch of style and personality to any space. With a variety of shapes, sizes, and colors, cinder blocks can be used to create a variety of interesting and eye-catching designs. Whether you’re looking to add a touch of rustic charm to your outdoor space or create a modern and stylish look indoors, cinder blocks can be used to create a unique and beautiful space. With a little creativity and imagination, cinder blocks can be used to create a space that is both functional and aesthetically pleasing.

Crafting Holidays: Fun and Festive Holiday Crafts to Make at Home

Source : https://st.depositphotos.com

Crafting holidays is a great way to get into the holiday spirit and make something special for your family and friends. Whether you’re looking for a fun activity to do with the kids or a unique gift to give, there are plenty of festive holiday crafts to make at home. From homemade ornaments to festive decorations, there are plenty of creative ideas to get you in the holiday spirit. With a few simple supplies and a little bit of creativity, you can create something special that will be cherished for years to come.

Get Creative this Holiday Season: 10 Fun and Festive Holiday Crafts to Make at Home

1. Snow Globe: Create a winter wonderland in a jar with this festive craft. Gather a mason jar, a small figurine, some glitter, and some glycerin. Fill the jar with water and glycerin, add the figurine, and sprinkle in the glitter. Seal the jar and shake it up to create a snow globe.

2. Paper Snowflakes: Cut out paper snowflakes to decorate your home for the holidays. Start with a square piece of paper and fold it in half diagonally. Cut out shapes along the edges and then unfold the paper to reveal your snowflake.

3. Holiday Wreath: Make a festive wreath to hang on your door. Gather some evergreen branches, a foam wreath form, and some ribbon. Attach the branches to the wreath form with wire or glue and then tie a ribbon around the wreath.

4. Felt Ornaments: Create some unique ornaments with felt. Cut out shapes from felt and then stitch them together to make ornaments. Add some ribbon or buttons for extra decoration.

5. Holiday Cards: Send some holiday cheer with homemade cards. Gather some cardstock, markers, and stickers. Cut the cardstock into card shapes and then decorate them with markers and stickers.

6. Gingerbread House: Bake a gingerbread house for the holidays. Gather some gingerbread dough, icing, and candy. Roll out the dough and cut out the pieces for the house. Bake the pieces and then assemble the house with icing and candy.

7. Pinecone Garland: Make a garland with pinecones. Gather some pinecones, string, and ribbon. Tie the string to the pinecones and then hang them on the wall or around the door.

8. Snowman: Create a snowman with some cotton balls and a few other supplies. Gather some cotton balls, a Styrofoam ball, and some buttons. Glue the cotton balls to the Styrofoam ball and then add buttons for eyes and a nose.

9. Holiday Tree: Make a holiday tree with some construction paper. Gather some green construction paper, scissors, and glue. Cut out a tree shape from the paper and then glue it to a piece of cardboard. Add decorations with markers or stickers.

10. Hot Cocoa Kit: Put together a hot cocoa kit for a festive gift. Gather some hot cocoa mix, marshmallows, and a mug. Place the ingredients in a jar or bag and add a festive ribbon.

Get Ready for the Holidays with These Easy and Affordable DIY Holiday Crafts

As the holiday season approaches, it is time to start thinking about how to decorate your home and make it festive. DIY holiday crafts are a great way to add a personal touch to your decorations and make your home feel warm and inviting. With a few simple supplies and a bit of creativity, you can create beautiful and affordable holiday decorations that will bring joy to your home.

One of the easiest and most affordable DIY holiday crafts is making paper snowflakes. All you need is a pair of scissors and some white paper. Cut the paper into a square and then fold it in half diagonally. Cut out shapes along the edges of the paper and then unfold it to reveal your snowflake. You can hang the snowflakes from the ceiling or use them to decorate your windows.

Another great DIY holiday craft is making a wreath. You can use a pre-made wreath form or make your own with a wire hanger and some green felt. Cut the felt into strips and then wrap it around the hanger. You can then add decorations such as pine cones, berries, and ribbon to make your wreath unique. Hang the wreath on your front door or in a window to add a festive touch to your home.

If you are looking for a more creative project, try making a holiday garland. You can use any type of material such as fabric, ribbon, or yarn. Cut the material into strips and then tie them together to create a long garland. You can hang the garland from the ceiling or use it to decorate your mantel.

These are just a few of the many DIY holiday crafts that you can make to decorate your home for the holidays. With a bit of creativity and some affordable supplies, you can create beautiful decorations that will bring joy to your home. So get ready for the holidays and start crafting!Crafting holidays is a great way to get into the holiday spirit and create something special for yourself or your loved ones. It can be a fun and creative way to spend time with family and friends, and it can also be a great way to make unique and meaningful gifts. Crafting holidays can be a great way to make memories and celebrate the season. Whether you’re looking for a fun activity to do with your family or a unique gift to give to someone special, crafting holidays can be a great way to make the most of the holiday season.