Small Space, Big Impact: Transform Your Bathroom with a Small Makeover

Source : https://miro.medium.com

Small Space, Big Impact: Transform Your Bathroom with a Small Makeover is a comprehensive guide to making the most of your bathroom space. Whether you’re looking to make a few small changes or a complete overhaul, this book provides the tips and tricks you need to make the most of your bathroom. From choosing the right fixtures and finishes to creating a functional and stylish layout, this book will help you create a bathroom that is both beautiful and practical. With easy-to-follow instructions and helpful illustrations, you’ll be able to transform your bathroom into a space that you’ll love.

How to Make a Big Impact in a Small Bathroom: Tips for a Successful Makeover

A small bathroom can be a challenge to makeover, but with the right approach, it can be transformed into a beautiful and functional space. Here are some tips for making a big impact in a small bathroom:

1. Maximize Storage: Make the most of the limited space by adding storage solutions such as shelves, cabinets, and drawers. This will help to keep the bathroom organized and clutter-free.

2. Choose the Right Fixtures: Select fixtures that are both stylish and functional. Consider a pedestal sink to save space, or a wall-mounted toilet to free up floor space.

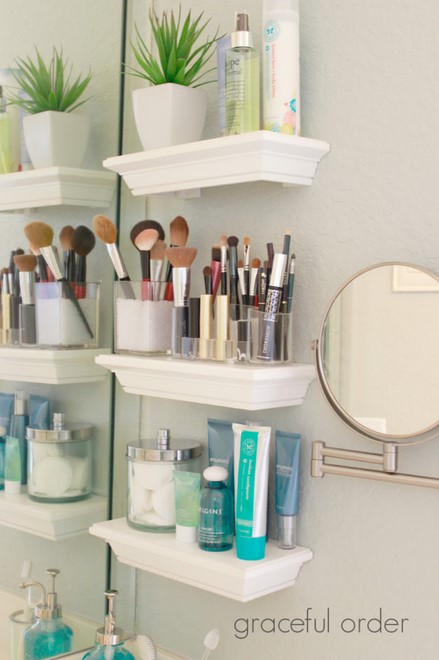
3. Utilize Vertical Space: Install shelves and cabinets on the walls to make use of the vertical space. This will help to keep the floor area open and uncluttered.

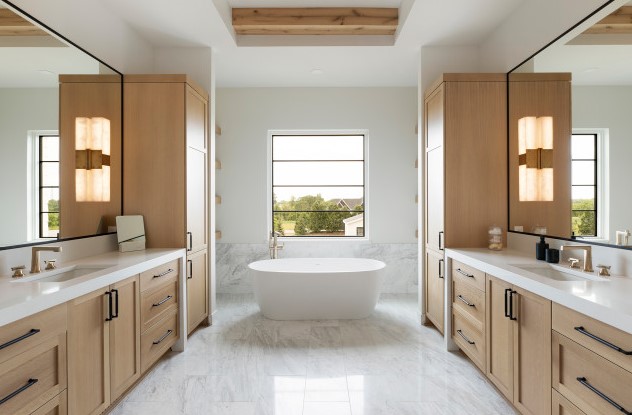
4. Add a Mirror: Mirrors can make a small bathroom appear larger and brighter. Choose a large mirror that will reflect light and create the illusion of a bigger space.

5. Use Light Colors: Light colors will make the room appear larger and brighter. Choose light colors for the walls, floor, and fixtures to create a more spacious feel.

6. Add a Statement Piece: Add a bold statement piece such as a bright rug or a unique piece of artwork to make the room stand out.

By following these tips, you can make a big impact in a small bathroom. With the right approach, you can transform a small bathroom into a beautiful and functional space.

Creative Ideas for Maximizing Space in a Small Bathroom Makeover

When it comes to small bathroom makeovers, maximizing space is key. Here are some creative ideas to help you make the most of your small bathroom:

1. Install a Wall-Mounted Sink: Wall-mounted sinks are a great way to save space in a small bathroom. Not only do they free up floor space, but they also provide a modern, streamlined look.

2. Add Shelving: Shelving is a great way to add storage without taking up too much space. Consider adding shelves above the toilet or around the sink to store towels, toiletries, and other items.

3. Use Mirrors: Mirrors can make a small bathroom look bigger. Place a large mirror on the wall opposite the sink to create the illusion of a larger space.

4. Install a Corner Shower: Corner showers are a great way to maximize space in a small bathroom. They take up less room than a traditional shower and can be customized to fit your space.

5. Utilize Vertical Space: Make use of the vertical space in your bathroom by adding shelves, towel racks, and other storage solutions. This will help you keep your bathroom organized and free up floor space.

6. Choose Light Colors: Light colors can make a small bathroom look bigger. Consider painting the walls a light color and adding bright accents to create a more spacious feel.

By following these creative ideas, you can make the most of your small bathroom makeover and create a space that is both functional and stylish.Small Space, Big Impact: Transform Your Bathroom with a Small Makeover is a great resource for anyone looking to make a big impact in their bathroom without breaking the bank. With a few simple changes, you can create a beautiful and functional bathroom that will last for years to come. From choosing the right fixtures and finishes to adding storage and accessories, this guide provides all the information you need to make your bathroom makeover a success. With a little bit of creativity and a few small changes, you can create a bathroom that is both stylish and functional.

Bathroom Beautification: Step-by-Step Guide to DIY Bathroom Sink Projects

Source : https://foyr.com

Welcome to the world of bathroom beautification! This step-by-step guide to DIY bathroom sink projects will help you transform your bathroom into a beautiful and functional space. Whether you’re looking to upgrade your existing sink or install a brand new one, this guide will provide you with all the information you need to get the job done right. From choosing the right materials to installing the sink, this guide will walk you through the entire process. With the help of this guide, you’ll be able to create a bathroom sink that is both stylish and practical. So, let’s get started!

How to Transform Your Bathroom Sink with a DIY Project: A Step-by-Step Guide

Transforming a bathroom sink can be a rewarding DIY project that can add a unique touch to any bathroom. This step-by-step guide will provide the necessary steps to complete this project.

Step 1: Gather Materials

Before beginning the project, it is important to gather all the necessary materials. This includes a new sink, a sink basin, a sink faucet, a sink drain, and any other materials needed for installation.

Step 2: Prepare the Area

Before installing the new sink, it is important to prepare the area. This includes removing any existing fixtures, such as the old sink, faucet, and drain. It is also important to make sure the area is clean and free of debris.

Step 3: Install the Sink Basin

Once the area is prepared, the next step is to install the sink basin. This involves attaching the basin to the wall and securing it with screws. It is important to make sure the basin is level and secure before continuing.

Step 4: Install the Sink Faucet

The next step is to install the sink faucet. This involves attaching the faucet to the sink basin and securing it with screws. It is important to make sure the faucet is level and secure before continuing.

Step 5: Install the Sink Drain

The final step is to install the sink drain. This involves attaching the drain to the sink basin and securing it with screws. It is important to make sure the drain is level and secure before continuing.

Step 6: Test the Sink

Once the sink is installed, it is important to test it to make sure it is functioning properly. This includes turning on the faucet and checking for any leaks.

By following these steps, you can successfully transform your bathroom sink with a DIY project. With the right materials and a bit of patience, you can create a unique and stylish sink that will be the envy of your friends and family.

Creative Ideas for Upgrading Your Bathroom Sink: A Beginner’s Guide to Bathroom Beautification

Upgrading your bathroom sink is a great way to add a touch of style and sophistication to your bathroom. Whether you’re looking to make a statement or simply want to refresh the look of your bathroom, there are a variety of creative ideas to consider. This beginner’s guide to bathroom beautification will provide you with some helpful tips and ideas for upgrading your bathroom sink.

First, consider the type of sink you want to install. There are a variety of styles and materials to choose from, including ceramic, porcelain, glass, and stainless steel. Each material has its own unique look and feel, so it’s important to choose one that best suits your style and budget. Additionally, you may want to consider the size and shape of the sink to ensure it fits in the space you have available.

Once you’ve chosen the type of sink you want, you can start thinking about ways to upgrade it. One option is to add a decorative faucet. There are a variety of styles and finishes to choose from, so you can find one that complements the look of your sink. Additionally, you can add a backsplash to the sink to give it a more finished look.

Another way to upgrade your bathroom sink is to add a vessel sink. Vessel sinks are a great way to add a modern touch to your bathroom. They come in a variety of shapes and sizes, so you can find one that fits your space. Additionally, you can choose from a variety of materials, such as glass, stone, and metal.

Finally, you can also consider adding a vanity to your bathroom sink. Vanities come in a variety of styles and materials, so you can find one that fits your style and budget. Additionally, you can add a mirror to the vanity to give the space a more finished look.

Upgrading your bathroom sink is a great way to add a touch of style and sophistication to your bathroom. With a little creativity and some helpful tips, you can easily transform your bathroom into a beautiful and inviting space.The DIY bathroom sink projects outlined in this guide are a great way to add a personal touch to your bathroom. With a few simple tools and materials, you can create a unique and stylish sink that will be the centerpiece of your bathroom. Whether you choose to install a new sink or simply update an existing one, these projects are sure to add a touch of beauty and style to your bathroom. With a little bit of creativity and effort, you can create a beautiful and functional bathroom sink that will last for years to come.

Bathroom Beauty: A Step-by-Step Guide to Building a Bathroom Vanity

Source : https://st.hzcdn.com

Welcome to Bathroom Beauty: A Step-by-Step Guide to Building a Bathroom Vanity! This guide will provide you with all the information you need to build a beautiful and functional bathroom vanity. We will cover everything from selecting the right materials and tools to assembling and finishing the vanity. We will also provide helpful tips and tricks to make the process easier and more enjoyable. So, if you’re ready to get started, let’s dive in and start building your dream bathroom vanity!

How to Choose the Right Materials for Building a Bathroom Vanity

When building a bathroom vanity, it is important to choose the right materials to ensure the vanity is both aesthetically pleasing and durable. The following are some tips for selecting the best materials for a bathroom vanity.

First, consider the overall design of the bathroom. Different materials can be used to create different looks, so it is important to choose materials that will complement the existing design. For example, if the bathroom has a modern aesthetic, materials such as stainless steel or glass may be appropriate. If the bathroom has a more traditional look, materials such as wood or marble may be better suited.

Second, consider the function of the vanity. Different materials can be used to create different levels of durability and water resistance. For example, wood is a popular choice for bathroom vanities, but it is not as water-resistant as other materials such as stainless steel or stone.

Third, consider the maintenance requirements of the materials. Some materials, such as wood, require regular maintenance to keep them looking their best. Other materials, such as stainless steel, require minimal maintenance and are more resistant to water damage.

Finally, consider the cost of the materials. Different materials can vary greatly in cost, so it is important to consider the budget when selecting materials for a bathroom vanity.

By considering the overall design, function, maintenance requirements, and cost of the materials, it is possible to choose the right materials for building a bathroom vanity. With the right materials, a bathroom vanity can be both aesthetically pleasing and durable.

Tips for Installing a Bathroom Vanity for Maximum Beauty and Functionality

1. Measure the Space: Before purchasing a bathroom vanity, it is important to measure the space available in the bathroom. This will help to ensure that the vanity will fit properly and that there is enough room for the vanity and other bathroom fixtures.

2. Choose the Right Vanity: When selecting a bathroom vanity, it is important to choose one that is the right size and style for the space. Consider the size of the vanity, the number of drawers and shelves, and the type of countertop.

3. Install the Vanity: Once the vanity has been selected, it is time to install it. Make sure to follow the manufacturer’s instructions for installation. It is also important to make sure that the vanity is level and secure.

4. Add Finishing Touches: Once the vanity is installed, it is time to add the finishing touches. Consider adding a backsplash, a mirror, and other decorative elements to complete the look.

5. Maintain the Vanity: To ensure that the vanity looks its best, it is important to maintain it. Regularly clean the vanity and countertop to keep it looking its best.

By following these tips, you can ensure that your bathroom vanity is installed properly and looks its best. With the right vanity, you can create a beautiful and functional bathroom space.In conclusion, building a bathroom vanity is a great way to add a touch of beauty and style to any bathroom. With the right materials, tools, and a bit of patience, anyone can create a beautiful and functional vanity that will last for years to come. With the help of this guide, you can now confidently create a bathroom vanity that will be the envy of your friends and family.

Bathroom Organizing Tips

Make the most out of your bathroom regardless of its size with these simple steps.

Organize your bathroom cabinets. Make your bathroom cabinets a place for the things you need to use regularly. You can arrange the items you want to store things like medicines, shavers, hair products, makeup, etc. in a systematic way. Like from the stuff you use all the time to those you hardly use. Or, since combs, hair dryers, gels and curlers might take a lot of space in your bathroom cabinet, you may want to have a different tub and put it in a different place.

Extra storage for bathroom towels. If a towel rack is not enough for the whole family, try adding towel hooks to your bathroom. Towel hooks are easy to mount, inexpensive and will give the family extra space to hang their towels.

Utilizing the space over your toilet. The space over a bathroom toilet is also a good place to put toiletries, extra toilet papers, even extra towels. You better use a bathroom cabinet with closed shelving if you can’t keep the toilet cover down.

There is always a place for organization in all bathrooms, even the small ones. You just have to know where to look and be creative in how you arrange your stuff.

Bathroom Glam: Chandeliers that Add Elegance to Your Bathrooms

Bathroom Glam is a unique way to add a touch of elegance and sophistication to your bathroom. With the right chandelier, you can transform your bathroom into a luxurious and inviting space. Whether you’re looking for a modern, contemporary, or traditional style, there are plenty of options to choose from. From crystal chandeliers to rustic iron fixtures, you can find the perfect chandelier to fit your bathroom’s aesthetic. With the right chandelier, you can create a beautiful and inviting atmosphere in your bathroom.

How to Create a Glamorous Bathroom with Chandeliers

Creating a glamorous bathroom with chandeliers is a great way to add a touch of luxury to your home. Chandeliers can be used to create a stunning focal point in the bathroom, while also providing a source of light. Here are some tips for creating a glamorous bathroom with chandeliers.

First, consider the size of the chandelier. Chandeliers come in a variety of sizes, so it is important to choose one that is appropriate for the size of the bathroom. A large chandelier can overpower a small bathroom, while a small chandelier may not provide enough light.

Second, choose a chandelier that complements the style of the bathroom. If the bathroom has a modern design, a contemporary chandelier may be the best choice. If the bathroom has a more traditional look, a classic chandelier may be more appropriate.

Third, consider the type of lighting the chandelier provides. Chandeliers can provide ambient lighting, task lighting, or both. Ambient lighting is used to create a soft, inviting atmosphere, while task lighting is used to provide focused light for activities such as shaving or applying makeup.

Fourth, choose a chandelier that is easy to maintain. Chandeliers can be made from a variety of materials, including glass, metal, and crystal. Glass and metal chandeliers are easier to clean and maintain than crystal chandeliers.

Finally, consider the placement of the chandelier. It should be placed in a spot that is easily accessible and does not obstruct the flow of traffic in the bathroom.

By following these tips, you can create a glamorous bathroom with chandeliers. With the right chandelier, you can add a touch of luxury to your home and create a stunning focal point in the bathroom.

The Benefits of Installing a Chandelier in Your Bathroom

Installing a chandelier in your bathroom can be a great way to add a touch of elegance and sophistication to the room. Not only does it provide a beautiful focal point, but it can also provide a number of practical benefits. Here are some of the advantages of installing a chandelier in your bathroom.

First, a chandelier can provide a great source of light. Chandeliers are designed to provide a bright, even light that can be used to illuminate the entire bathroom. This can be especially helpful in bathrooms with limited natural light. Additionally, the light from a chandelier can be adjusted to create the perfect ambiance for any occasion.

Second, a chandelier can be a great way to add a touch of luxury to your bathroom. Chandeliers come in a variety of styles and designs, so you can find one that perfectly complements the decor of your bathroom. This can help to create a more inviting and luxurious atmosphere.

Finally, a chandelier can be a great way to add a touch of style to your bathroom. Chandeliers come in a variety of shapes and sizes, so you can find one that fits perfectly in your bathroom. This can help to create a unique and stylish look that will be sure to impress your guests.

Installing a chandelier in your bathroom can be a great way to add a touch of elegance and sophistication to the room. Not only does it provide a beautiful focal point, but it can also provide a number of practical benefits. From providing a great source of light to adding a touch of luxury and style, a chandelier can be a great addition to any bathroom.

Conclusion

Bathroom Glam: Chandeliers that Add Elegance to Your Bathrooms is a great way to add a touch of luxury and sophistication to any bathroom. With a wide variety of styles and designs available, there is sure to be a chandelier that will fit any bathroom’s decor. Chandeliers can be used to create a warm and inviting atmosphere, or to add a touch of glamour and elegance. No matter what your style, adding a chandelier to your bathroom can be a great way to make it look and feel more luxurious.

Bathroom Bliss: Transforming Your Space into a Relaxing Oasis

Welcome to Bathroom Bliss: Transforming Your Space into a Relaxing Oasis! This guide will help you create a tranquil and inviting bathroom that will be your own personal oasis. We will explore ways to make your bathroom a place of relaxation and comfort, from choosing the right colors and materials to adding the perfect accessories. With a few simple changes, you can turn your bathroom into a luxurious retreat. So, let’s get started and create your own bathroom bliss!

How to Create a Spa-Like Atmosphere in Your Bathroom: Tips for Incorporating Luxury Features and Finishes

Creating a spa-like atmosphere in your bathroom can be a great way to relax and unwind after a long day. With the right features and finishes, you can transform your bathroom into a luxurious retreat. Here are some tips for incorporating luxury features and finishes into your bathroom to create a spa-like atmosphere.

1. Invest in Quality Fixtures: Quality fixtures are essential for creating a spa-like atmosphere in your bathroom. Look for high-end fixtures that are both stylish and durable. Consider investing in a luxurious soaking tub, a rain shower head, and a heated towel rack.

2. Add Soft Lighting: Soft lighting is key for creating a relaxing atmosphere in your bathroom. Consider installing dimmable LED lights or wall sconces to create a warm, inviting ambiance.

3. Incorporate Natural Elements: Incorporating natural elements into your bathroom can help create a spa-like atmosphere. Consider adding plants, wood accents, and stone features to your bathroom.

4. Choose Neutral Colors: Neutral colors are a great way to create a calming atmosphere in your bathroom. Choose colors like white, beige, and gray to create a tranquil environment.

5. Install a Heated Floor: Installing a heated floor in your bathroom is a great way to add a touch of luxury. Heated floors are not only comfortable, but they can also help keep your bathroom warm and cozy.

6. Add a Sauna: If you have the space, consider adding a sauna to your bathroom. Saunas are a great way to relax and unwind after a long day.

By following these tips, you can easily create a spa-like atmosphere in your bathroom. Investing in quality fixtures, adding soft lighting, incorporating natural elements, choosing neutral colors, installing a heated floor, and adding a sauna are all great ways to create a luxurious retreat in your home.

Designing a Functional and Stylish Bathroom: Ideas for Maximizing Space and Storage Solutions

When it comes to designing a functional and stylish bathroom, there are many considerations to take into account. Maximizing space and storage solutions are key components of any successful bathroom design. Here are some ideas to help you create a bathroom that is both functional and stylish.

First, consider the layout of the bathroom. A well-designed bathroom should have a logical flow, with the sink, toilet, and shower/tub all in close proximity. This will help to maximize the available space and make the bathroom easier to use. Additionally, consider the placement of the vanity and storage cabinets. These should be placed in a way that allows for easy access and efficient use of the space.

When it comes to storage solutions, there are many options available. Wall-mounted cabinets are a great way to maximize space and keep items organized. Floating shelves are also a great option for storing items such as towels, toiletries, and other bathroom essentials. Additionally, consider adding a medicine cabinet to store medications and other items.

When it comes to style, there are many options available. Consider the overall color scheme of the bathroom, as well as the materials used. For a modern look, consider using sleek, contemporary materials such as glass, stainless steel, and chrome. For a more traditional look, consider using natural materials such as wood and stone. Additionally, consider adding decorative elements such as artwork, mirrors, and lighting fixtures to add a personal touch to the space.

By following these tips, you can create a functional and stylish bathroom that maximizes space and storage solutions. With careful planning and thoughtful design, you can create a bathroom that is both beautiful and practical.

Conclusion

Bathroom Bliss: Transforming Your Space into a Relaxing Oasis is a great resource for anyone looking to create a tranquil and inviting bathroom. With its helpful tips and ideas, it provides readers with the tools they need to create a beautiful and calming space. Whether you’re looking to make a few small changes or a complete overhaul, this book is sure to provide you with the inspiration and guidance you need to make your bathroom a true oasis.

Tub Revival: Tub Reglazing Kits for a Refreshed Bathroom

Tub Revival is a revolutionary new product that offers homeowners the opportunity to easily and affordably refresh their bathroom. With Tub Revival, you can reglaze your tub in just a few simple steps, giving it a brand new look and feel. The kit includes everything you need to get started, including a special cleaner, primer, and topcoat. With Tub Revival, you can transform your bathroom in no time, giving it a fresh, modern look.

How to Choose the Right Tub Reglazing Kit for Your Bathroom Revival

When it comes to reviving your bathroom, tub reglazing kits can be a great way to give your tub a fresh, new look. However, with so many different kits available on the market, it can be difficult to know which one is right for you. To help you make the best decision, here are some tips for choosing the right tub reglazing kit for your bathroom revival.

First, consider the size of your tub. Different kits are designed for different sizes of tubs, so make sure you measure your tub before you purchase a kit. This will ensure that you get the right size kit for your tub.

Second, consider the type of finish you want. Different kits offer different finishes, so make sure you choose one that will give you the look you want. Some kits offer a glossy finish, while others offer a matte finish.

Third, consider the cost. Different kits can range in price, so make sure you compare prices before you make your purchase. You may also want to consider purchasing a kit that includes all the necessary supplies, such as sandpaper, primer, and paint.

Finally, consider the ease of use. Some kits are easier to use than others, so make sure you read the instructions carefully before you begin. If you’re not sure how to use the kit, you may want to consider hiring a professional to do the job for you.

By following these tips, you can be sure to choose the right tub reglazing kit for your bathroom revival. With the right kit, you can give your tub a fresh, new look and make your bathroom look like new again.

DIY Tub Reglazing: A Step-by-Step Guide to Reviving Your Bathroom on a Budget

Are you looking for a cost-effective way to give your bathroom a facelift? DIY tub reglazing is a great option for those who want to update their bathroom without breaking the bank. With a few simple steps, you can restore your tub to its former glory and give your bathroom a fresh, new look.

Before you begin, it’s important to make sure that your tub is in good condition. If there are any cracks or chips, they should be repaired before you start the reglazing process. Once you’ve ensured that your tub is in good condition, you’re ready to begin.

The first step is to prepare the surface of the tub. This involves cleaning the tub with a mild detergent and then sanding it down with a medium-grit sandpaper. This will help to remove any dirt, grime, and rust that may be present. Once the surface is clean and smooth, you’re ready to move on to the next step.

The next step is to apply a primer to the tub. This will help the reglazing material to adhere to the surface. Once the primer has dried, you can begin to apply the reglazing material. This can be done with a brush or roller, depending on the type of material you’re using. Make sure to follow the manufacturer’s instructions for the best results.

Once the reglazing material has been applied, you’ll need to let it dry for at least 24 hours. After this time, you can apply a topcoat to protect the finish. This will help to ensure that your tub looks great for years to come.

DIY tub reglazing is a great way to give your bathroom a facelift without spending a fortune. With a few simple steps, you can restore your tub to its former glory and give your bathroom a fresh, new look. So, what are you waiting for? Get started today and give your bathroom the makeover it deserves!

Conclusion

Tub Revival’s tub reglazing kits are an excellent way to give your bathroom a refreshed look without the hassle and expense of a full remodel. The kits are easy to use and provide a durable, long-lasting finish that will last for years. With a variety of colors and finishes to choose from, you can easily customize your bathroom to match your style and budget. Tub Revival’s reglazing kits are a great way to give your bathroom a new look without breaking the bank.

Bathroom Brilliance: 10 DIY Vanity Ideas to Transform Your Space

Welcome to Bathroom Brilliance! If you’re looking for a way to transform your bathroom space, you’ve come to the right place. We have 10 DIY vanity ideas that will help you create a beautiful and functional bathroom. From repurposing an old dresser to creating a custom vanity from scratch, these ideas will help you create a unique and stylish vanity that will be the centerpiece of your bathroom. With a few simple tools and materials, you can create a vanity that will last for years to come. So let’s get started and make your bathroom shine!

How to Create a Custom DIY Vanity for Your Bathroom: Tips and Tricks

Creating a custom DIY vanity for your bathroom can be a great way to add a unique and stylish touch to your home. With a few simple tips and tricks, you can create a vanity that is both functional and aesthetically pleasing. Here are some tips and tricks to help you create the perfect vanity for your bathroom.

1. Choose the Right Materials: When selecting materials for your vanity, make sure to choose materials that are durable and easy to clean. Consider materials such as wood, stone, or tile for the countertop and cabinetry.

2. Measure Carefully: Before you begin building your vanity, make sure to measure the space carefully. This will ensure that your vanity fits perfectly in the space and looks great.

3. Choose the Right Fixtures: Selecting the right fixtures for your vanity is essential. Choose fixtures that are both stylish and functional. Consider adding a sink, faucet, and storage space to your vanity.

4. Add a Mirror: Adding a mirror to your vanity is a great way to make the space look larger and more inviting. Consider adding a framed mirror or a medicine cabinet for extra storage.

5. Add Finishing Touches: Once you have finished building your vanity, add some finishing touches to make it look complete. Consider adding a backsplash, decorative knobs, or a shelf to complete the look.

Creating a custom DIY vanity for your bathroom can be a fun and rewarding project. With these tips and tricks, you can create a vanity that is both stylish and functional.

10 Creative DIY Vanity Ideas to Refresh Your Bathroom

1. Repurposed Dresser: Transform an old dresser into a stylish and functional vanity. Remove the drawers and add a sink and faucet to the top. Add a mirror to the wall above the dresser and you have a unique and creative vanity.

2. Floating Vanity: Create a modern look with a floating vanity. Install a sink and faucet on the wall and add a shelf below for storage.

3. Wall-Mounted Vanity: Create a sleek and modern look with a wall-mounted vanity. Install a sink and faucet on the wall and add shelves or cabinets below for storage.

4. Open Shelf Vanity: Create a modern and airy look with an open shelf vanity. Install a sink and faucet on the wall and add open shelves below for storage.

5. Pedestal Vanity: Create a classic look with a pedestal vanity. Install a sink and faucet on a pedestal and add shelves or cabinets below for storage.

6. Corner Vanity: Make the most of a small space with a corner vanity. Install a sink and faucet in the corner and add shelves or cabinets below for storage.

7. Upcycled Vanity: Create a unique look with an upcycled vanity. Use an old dresser, table, or cabinet and add a sink and faucet to the top.

8. Console Vanity: Create a modern look with a console vanity. Install a sink and faucet on a console table and add shelves or cabinets below for storage.

9. Wall-Mounted Sink: Create a modern look with a wall-mounted sink. Install a sink and faucet on the wall and add shelves or cabinets below for storage.

10. Vessel Sink Vanity: Create a unique look with a vessel sink vanity. Install a vessel sink and faucet on the countertop and add shelves or cabinets below for storage.

Conclusion

Bathroom Brilliance: 10 DIY Vanity Ideas to Transform Your Space is a great resource for anyone looking to give their bathroom a makeover. With a variety of ideas to choose from, you can easily find a vanity that fits your style and budget. Whether you’re looking for a modern, rustic, or traditional look, these DIY vanity ideas will help you create the perfect space for your bathroom. With a little bit of creativity and some elbow grease, you can transform your bathroom into a beautiful and functional space.

Bathroom Grace: Incorporating Ladders into Your Bathroom Decor

Bathroom Grace is a unique and stylish way to incorporate ladders into your bathroom decor. Whether you are looking for a modern, rustic, or vintage look, ladders can be used to create a unique and eye-catching design. With a few simple steps, you can transform your bathroom into a beautiful and inviting space. From adding a ladder as a towel rack to using it as a shelf, there are many ways to incorporate ladders into your bathroom decor. This guide will provide you with tips and ideas on how to use ladders to create a beautiful and functional bathroom.

How to Use a Ladder to Create a Unique and Stylish Bathroom: Tips and Ideas for Incorporating Ladders into Your Bathroom Decor

Ladders are a great way to add a unique and stylish touch to your bathroom decor. Whether you’re looking for a way to display towels, store toiletries, or just add a bit of character to your space, ladders can be a great addition. Here are some tips and ideas for incorporating ladders into your bathroom decor.

1. Hang Towels. A ladder is a great way to hang towels in your bathroom. You can hang them from the rungs of the ladder, or you can use S-hooks to hang them from the sides. This is a great way to keep your towels organized and easily accessible.

2. Create a Towel Rack. If you’d like to create a more permanent towel rack, you can use a ladder as the base. Simply attach the ladder to the wall and hang your towels from the rungs. This is a great way to add a unique and stylish touch to your bathroom.

3. Use as a Shelf. Ladders can also be used as shelves. You can place them against the wall and use the rungs to store toiletries, towels, and other bathroom items. This is a great way to keep your bathroom organized and clutter-free.

4. Hang Baskets. If you’d like to add a bit of storage to your bathroom, you can hang baskets from the rungs of the ladder. This is a great way to store items like toiletries, towels, and other bathroom essentials.

5. Add a Ladder Rack. If you’d like to add a bit of extra storage to your bathroom, you can install a ladder rack. This is a great way to store items like towels, toiletries, and other bathroom essentials.

These are just a few ideas for incorporating ladders into your bathroom decor. With a bit of creativity, you can create a unique and stylish look that will add character to your space.

The Benefits of Incorporating a Ladder into Your Bathroom Design: How to Achieve a Functional and Elegant Look with Bathroom Ladders

When it comes to bathroom design, incorporating a ladder into the space can be a great way to achieve a functional and elegant look. Ladders are a versatile and stylish addition to any bathroom, and they can be used in a variety of ways to create a unique and attractive design. Here are some of the benefits of incorporating a ladder into your bathroom design, and how to achieve a functional and elegant look with bathroom ladders.

One of the main benefits of incorporating a ladder into your bathroom design is that it can provide additional storage space. Ladders are a great way to store towels, toiletries, and other items that you may need in the bathroom. They can also be used to hang items such as robes and towels, freeing up valuable floor space. Additionally, ladders can be used to display decorative items such as plants or artwork, adding a touch of style to the space.

Incorporating a ladder into your bathroom design can also help to create a more open and airy feel. Ladders can be used to divide the space, creating distinct areas for different activities. This can help to make the bathroom feel larger and more inviting. Additionally, ladders can be used to create a focal point in the room, drawing the eye to a particular area.

When it comes to achieving a functional and elegant look with bathroom ladders, it is important to choose the right style and material. Wooden ladders are a popular choice for bathrooms, as they are both stylish and durable. Metal ladders are also a great option, as they are lightweight and easy to move around. Additionally, there are a variety of colors and finishes available, so you can find a ladder that will complement the existing decor in your bathroom.

Finally, it is important to consider the safety of the ladder when incorporating it into your bathroom design. Make sure that the ladder is securely attached to the wall and that it is placed in an area that is not prone to slipping or tripping. Additionally, it is important to ensure that the ladder is not placed in an area where it could be a hazard to children or pets.

Incorporating a ladder into your bathroom design can be a great way to achieve a functional and elegant look. With the right style and material, ladders can provide additional storage space, create a more open and airy feel, and act as a focal point in the room. Additionally, it is important to consider safety when incorporating a ladder into your bathroom design. By following these tips, you can create a beautiful and functional bathroom design with the help of a ladder.

Conclusion

In conclusion, incorporating ladders into your bathroom decor is a great way to add a unique and stylish touch to your space. Not only do ladders provide a practical storage solution, but they also add a touch of grace and charm to the room. With a variety of styles and materials to choose from, you can easily find a ladder that will fit your bathroom’s aesthetic and provide you with the storage you need.

VANITY UNITS


A vanity unit is a small cupboard that stands on the floor in the bathroom and has a wash basin. They help you shelving toiletries ensuring you bathroom is clean and tidy. Vanity units come in various designs and sizes. Listed below are the various types of vanity units.

  1. Cloak room vanities

Designed specifically for small or minimal space. Cloak room vanities are ideal for tight spaces as they are small in size unlike the other vanity units. They also come with a small in-built cabinet which will help you in storing a few toiletries.

  1. Vanity Cabinets

Similar to kitchen cabinets, vanity cabinets are spacious and larger in size hence their popularity. They are available in various sizes depending on the amount of storage space you need and the sink type you have. They have inbuilt cabinets just to give you the extra space you need.

  1. Corner vanities

As the name suggests, they are made to fit in corners. They are ideal for bathrooms with limited space. You can also opt for corner vanities if your aim is to minimize space usage.

  1. Round Bathroom vanities

With their easy to install feature and small size, you may want consider this if you need to install the vanity unit by yourself. They are also ideal for minimal space utilization.

  1. Double- Unit Vanities

These are designed to fit two basins unlike the single unit vanities. Their large size consequently makes them occupy more space. On the positive they also provide you with enough space to keep your toiletries.

  1. Square vanities

Square vanities just like round bathroom vanities save on space. Despite their small size they will still offer you the storage space you need.

Mentioned above are the various vanity units at your disposal to improve your bathroom outlook. All Things Bathroom Vanity Units will provide you with images of these vanity units and a more detailed information of the various units.